Amateur Canberra Spectroscopy System
Author: Jay Howson
Date: March-2019
Updated: July-2022
Updated: March-2024
Quick Links
Intro
Canberra (now Mirion) is a maker of high end spectroscopy equipment, radiation detection equipment, and associated software. Much like ORTEC they have a wide selection of NIM instrumentation and standalone products.
One of the downsides to amateurs using Canberra products at home for spectroscopy; Is the inability to easily interface a computer with Canberra’s modules. This feat is easily accomplished if you happen to be lucky enough to afford their software. (Canberra if you are reading; a lite version of the software would be nice…) In-fact an entire product line (the 96** series NIM modules) is almost completely off limits to an amateur user, because they don’t have front panel controls at all, instead being controlled digitally by the Instrument Control Bus (ICB).
While there are a few individuals (Countable on one hand) who have found ways to utilize the Canberra technology, while you can find the occasional mention on the internet. They have not yet written a comprehensive document explaining how they did it. My hope is that this page will serve as that document and help many others get the Canberra modules going.
The key component is EPICS, which stands for Experimental Physics and Industrial Control System. It is a very powerful piece of software made available by Argonne national labs. You can read more about it here https://epics.anl.gov/ . We will be using a smaller subset of this software to control the Canberra NIM modules, found here https://cars9.uchicago.edu/software/epics/mca.html . I encourage users to check out the MCA page, as it includes alot of information not covered here.
Special Thanks
Before we continue, I would like to give a special shout out to Mark Rivers at the Argonne National Lab. His knowledge and patience with my limited computer abilities is the only reason I was able to get this working.
Another shout out to our friend Jim. whom provided me with my first set of Canberra modules, and jump started this effort. Following suit, A shout out to Tim who gave up trying to make the Canberra modules work and gave them to Jim many years ago.
Getting Started
The minimum hardware you will need
- A computer
- With a free Ethernet port (
you cannot use a switch, it must be a direct connect Ethernet port)- Edit in March 2024: According to Mr. Mark Rivers, Apparently you can use a switch (but not a router). I have not yet tired to use a switch, thus I am unaware if it comes with any special caveats.
- Edit in March 2024: One individual who has followed this tutorial and confirmed that a USB ethernet dongle will function for this purpose as well.
- With a free Ethernet port (
- A NIM-BIN
- A Canberra 556 Acquisition Interface Module
- A Canberra Analog Digital Converter (ADC)
- Canberra 8713 or Canberra 9635 for example
- Alternatively you can use a DSA series standalone unit as well.
- I tested with a DSA-2000
- I have not tested with a TCA unit (if anyone has one they would like to donate to the cause, let me know)
- An ethernet Tranceiver
- A 34 Pin Ribbon Cable (2×17 2.54 Pitch Female-Female)
- A 6 Inch Should be fine
- A 20 Pin Ribbon Cable (2×10 2.54 Pitch Male-Male-Male-Male-etc)
- Its better to just buy a few feet of cable\connectors and make your own
- A standard Ethernet cable
- Associated Coax Cables, BNC, MHV, etc
- Detector/Preamplifier, HV Supply, and Amplifier of your choice
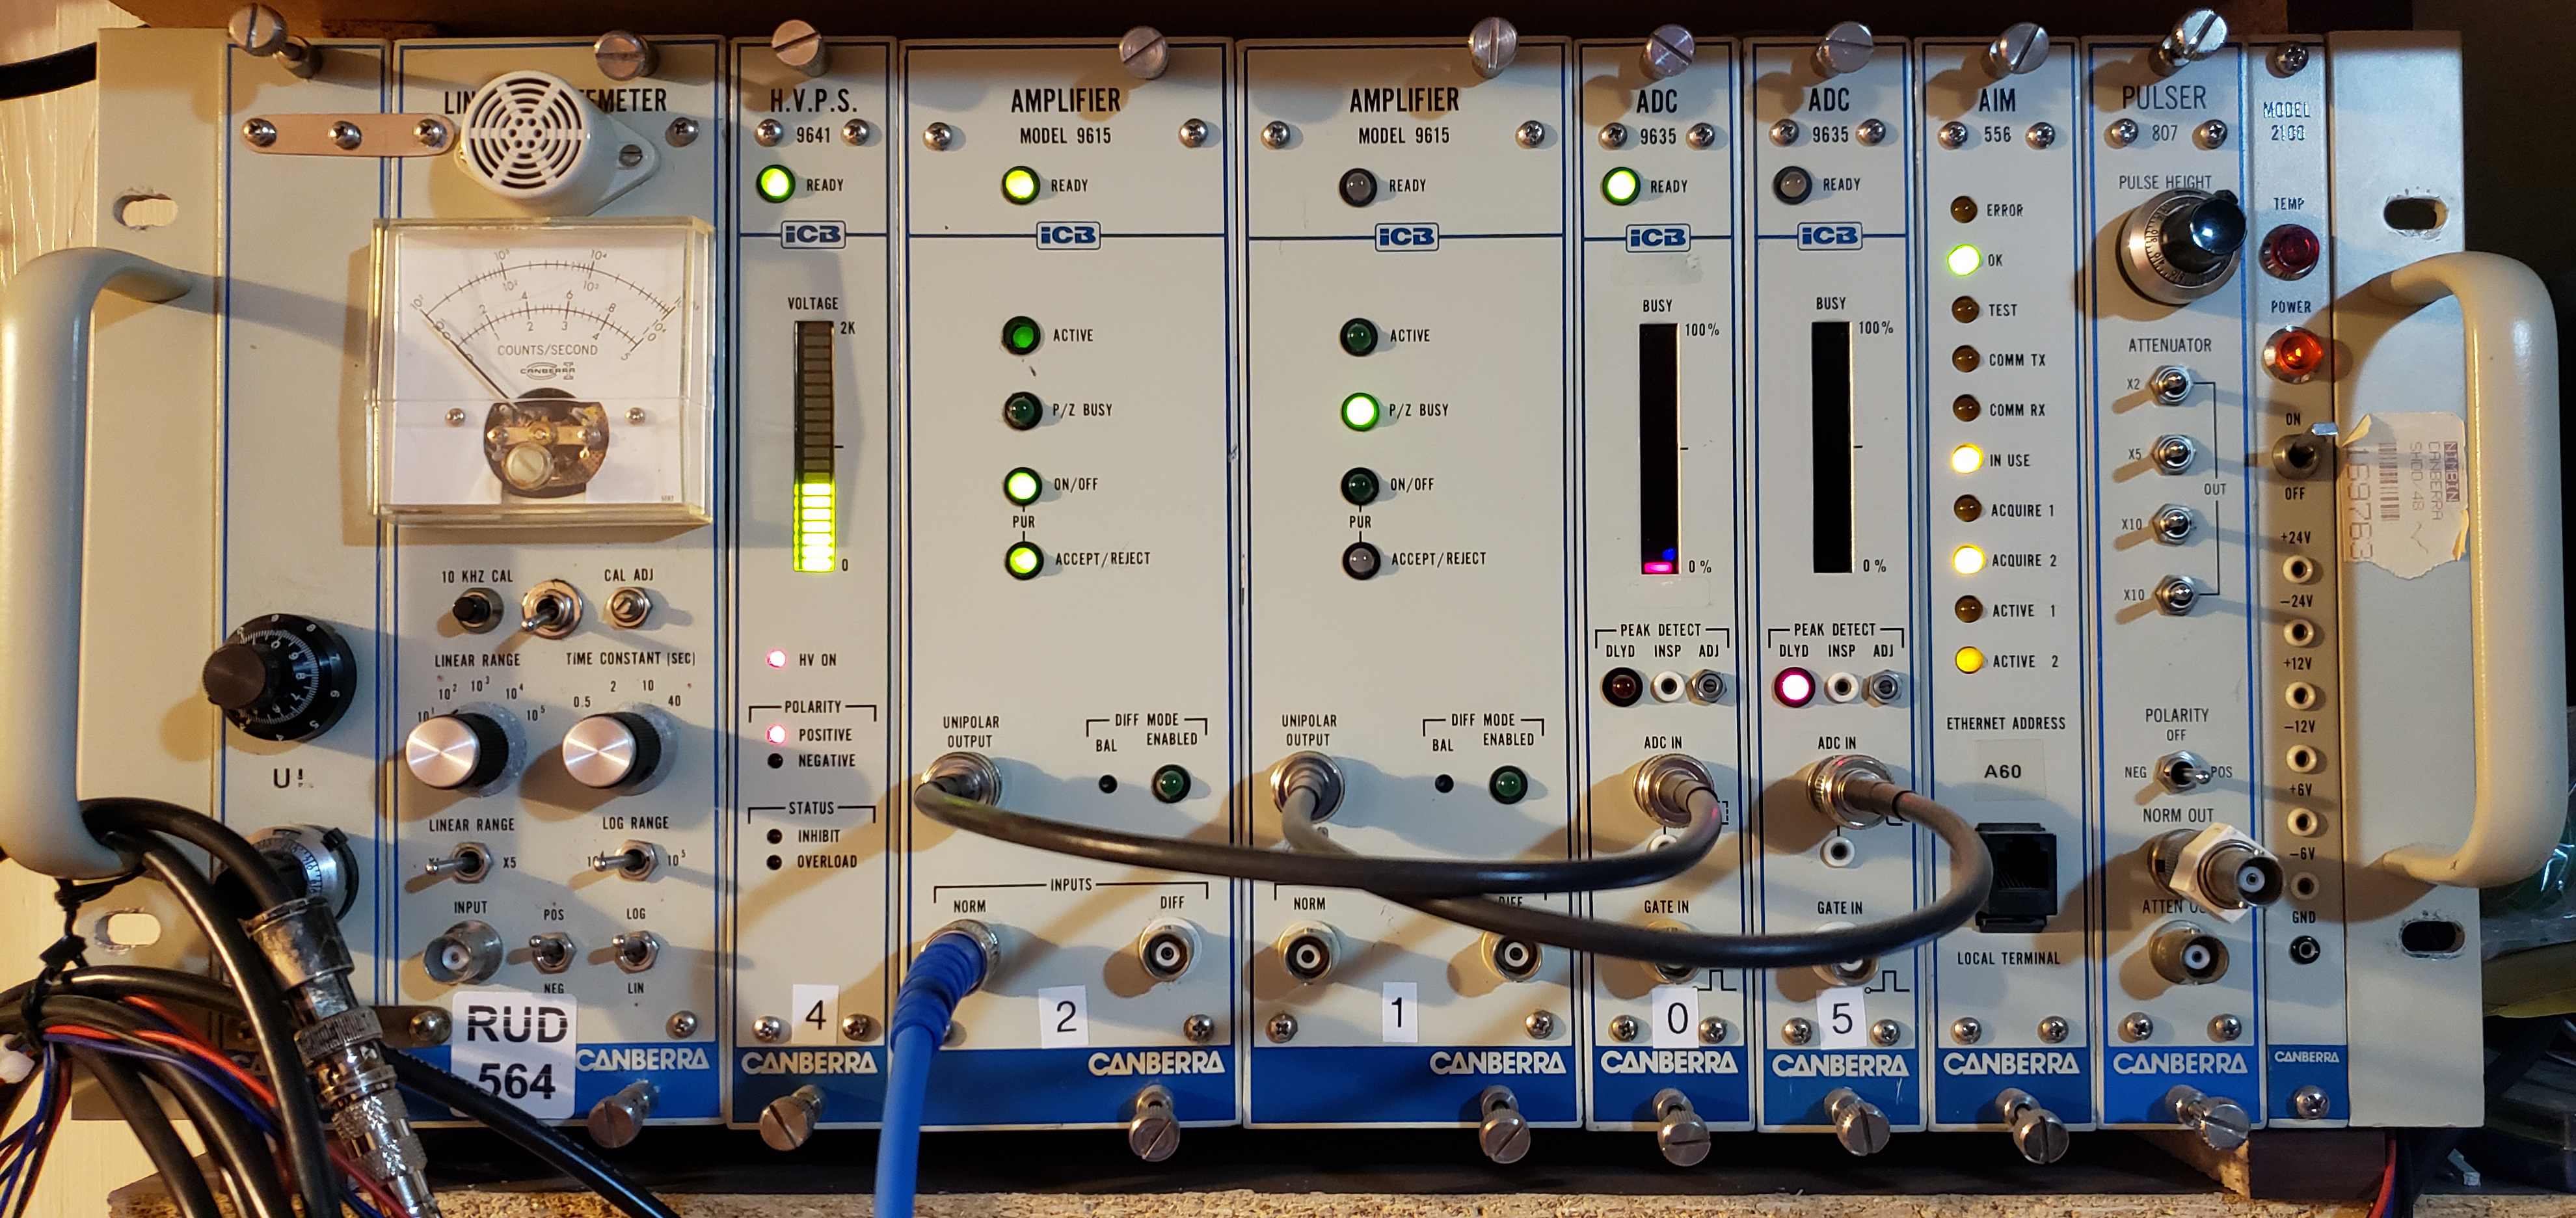
- I use the Canberra 1641 2KV HV Supply and Canberra 9615 Amplifier with a Scionix 38B57 scintillator
Software you should download
- The Standalone Epics MCA application
- Documentation
- Zip Download
- https://cars.uchicago.edu/software/pub/
- Win7, right click, download mcaStandalone_R7-7.zip
- Win11, right click, download mcaStandalone_R7-10
- Epics Windows Tools
- Provides windows with the tools necessary to run the EPICS software GUI’s (MEDM) and allow command line interfacing to the Canberra AIM
- Windows Packet Capture Library
- https://www.winpcap.org/ – If using windows 7
- https://npcap.com/ – if using windows 11
- MobaXTerm
- Notepad++
- Not Really Necessary, but you wont regret it
- Essentially the standard windows notepad, but 1000 times better
- 7-Zip
- If you don’t already have this i would be surpised
- basically WinZip, except 1000% better
- IDL_MCA
- This only if you intend to use the IDL enviroment (see the IDL MCA section for why you may not want to download right away)
- https://cars.uchicago.edu/software/pub/
- right click, download http://cars.uchicago.edu/software/pub/idl_mca.tar
- A .tar file is like a .zip file. 7-zip will take care of you
- This only if you intend to use the IDL enviroment (see the IDL MCA section for why you may not want to download right away)
Set up your NIM-Bin and modules
- Acquire your Min-Bin
- if this is your first time, it is wise to plug in, power up and test each of the voltages to make sure everything is fine before plugging in your modules.
- With Power off, insert your modules
- it is prudent to place your AIM module in slot 2 and the ADC module into slot 3
- Connect your 34pin ribbon cable between the ADC and AIM
- Connect your 20pin ICB cables if you are using the ICB functionality
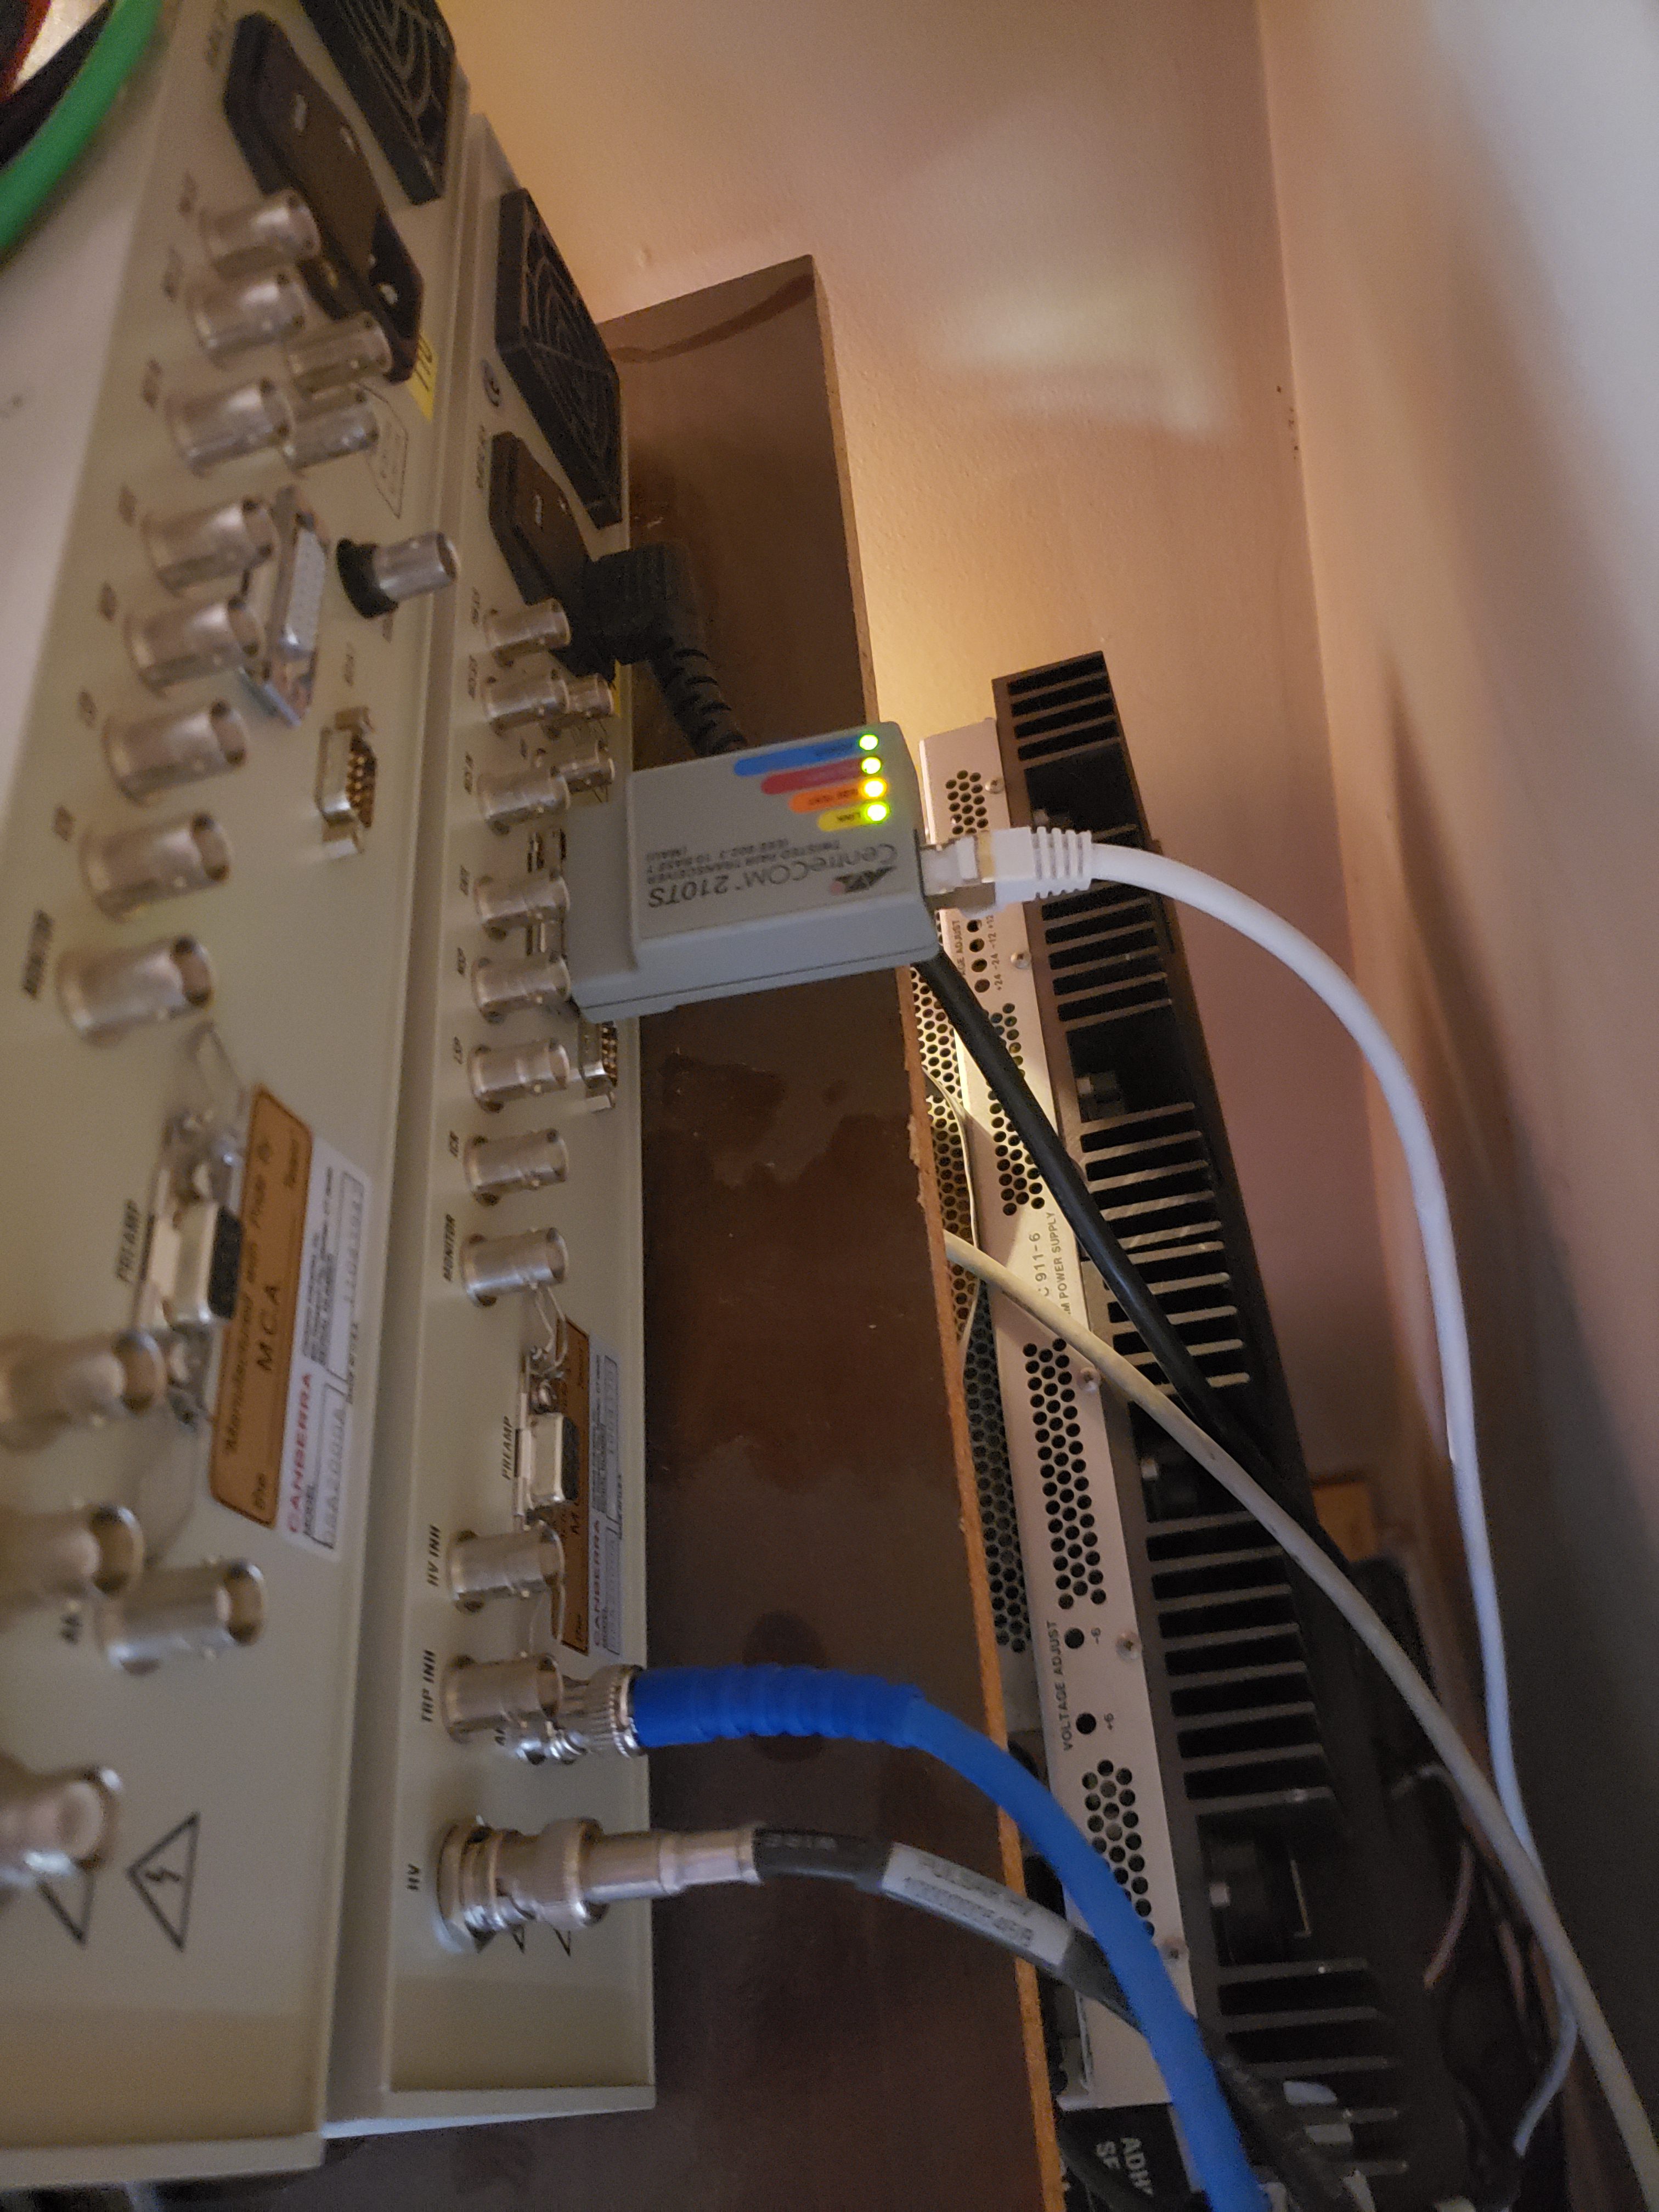
- connect the Ethernet transceiver to the AIM
- There is some degree of strangeness with this step.
- Jim tried to get his 556A working recently (via this tutorial) and found that he needed to use a crossover Ethernet cable.
- He believes this is because he is using his computers only LAN port, while I am using a PCIe LAN port I added to the computer.
- at time of writing, I do not know if my cable is a crossover or not, but one of these days I will try and figure that out / update this text.
- connect the Ethernet cable to the transceiver and the computers Ethernet port (which must be on the computer, a switch or breakout will not work)
- Also set up your other modules if you wish, the amplifier, HV supply, your detector, etc.
- With everything connected power up your NIM bin and modules
- The AIM should run thru a test sequence, an reach a steady state with the OK light illuminated green.
Install Software and configure computer
Honestly, once the process was explained to me, it really wasn’t that hard. I’m not a computer person, so things really needed to be spelled out for me at some points. I will do the same for you. I apologize if the level of detail is just too much for some.
A note: Initially I performed these operations on Windows 7-64 bit. I and subsequently performed an install on windows 11 as well, and have distributed some minor updates into the below text as a result. over all the two installs were pretty much the same.
It might be worth performing a full backup of your computer before you start…
Install The following
- EPICS windows tools
- WinPCAP
- MobaXterm
- Notepad++
Add EPICS Window Tools to your system PATH
- Note: This is slightly different on windows 11, but what needs to be done is the same, it was actually a little easier.
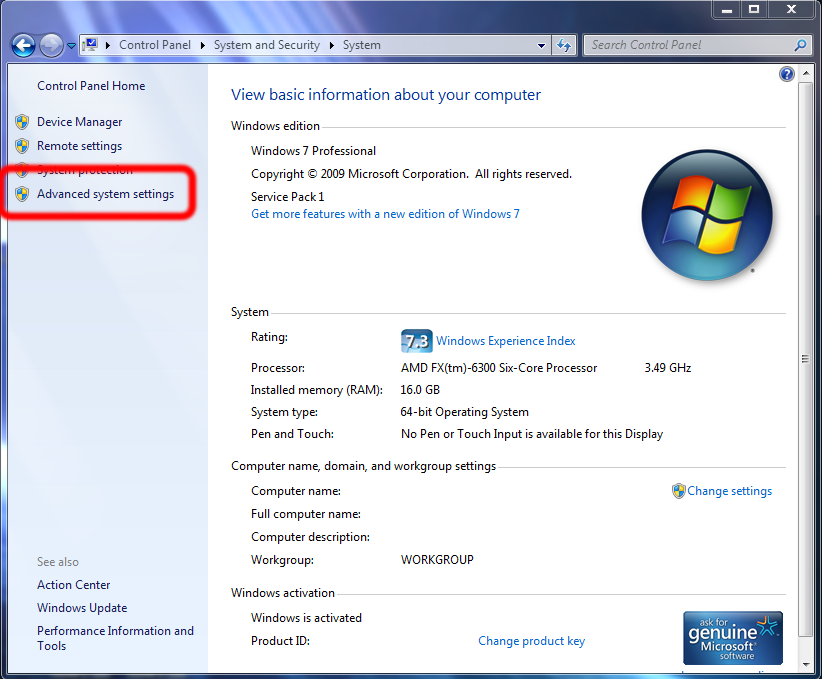
- Open “Computer”, also known as “My Computer”
- Click “System Properties” in the upper left
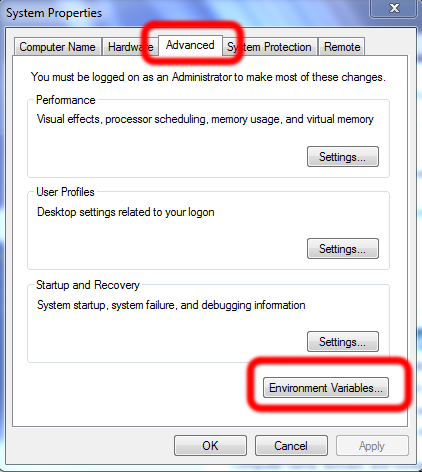
- In the window that opened, Click “Advanced System Settings”
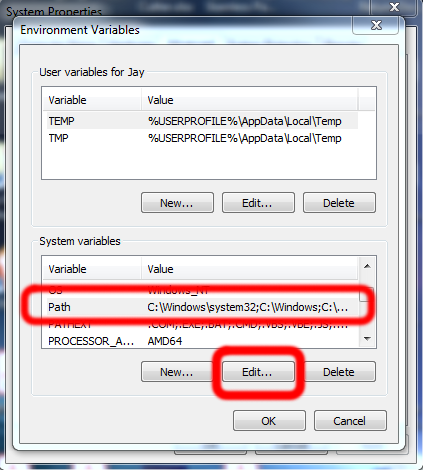
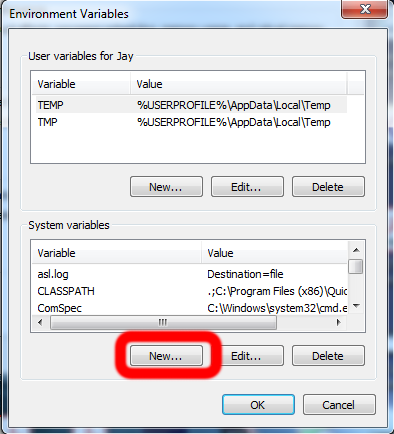
- In yet another window, Click “Environment Variables”
- Again in the new window, Under “System Variables” locate and select “Path” and click “Edit”
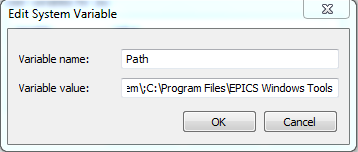
- Now, this is VERY IMPORTANT-DO NOT DELETE ANYTHING IN THIS BOX, I will not admit to knowing why this is important…
- You want to find the end of the variable,
- Add a semicolon “;”
- Type the path to which you installed “EPICS Windows Tools”
- In my case the path was “C:\Program Files\EPICS Windows Tools”
- Click “Ok”
- to Check that you did it correctly
- Open the command Prompt (CMD)
- Type “PATH”
- The Output should now include the EPICS windows Tools Path you just added
- Open the command Prompt (CMD)
Here are some Pics to help you along
Modifying Max_Bytes
If you try to use epics for more than 2048 channels. You will find that you cant read all the data due to a Max Bytes limit. This will fix that.
- Follow instructions in “Add EPICS Window Tools to your system PATH” to access system variables (above)
- Under system variables Click New
- type “EPICS_CA_MAX_ARRAY_BYTES” for variable name
- make the variable value, something large.
- I chose “10000000”
IDL path variable
You should only need to do this step if you plan to use the IDL MCA, otherwise just ignore it
- Follow instructions in “Add EPICS Window Tools to your system PATH” to access system variables (above)
- Under system variables Click New
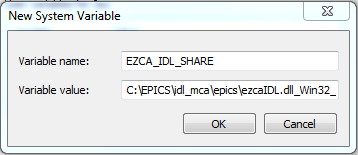
- type “EZCA_IDL_SHARE” for variable name
- The varible value is the path to “ezcaIDL.dll_Win32_x86_64”
- in my case “C:\EPICS\idl_mca\epics\ezcaIDL.dll_Win32_x86_64”
- obviously pick the x86 version only if your on a 32 bit system
Extract the Standalone Epics MCA Application
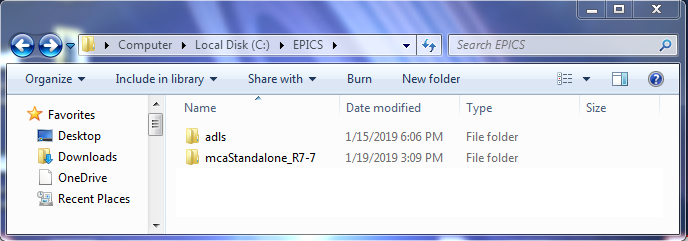
- Create a new folder under the “C:” drive (or whatever drive your OS is installed on)
- I called my folder “EPICS”
- Within the created folder, create 2 more folders .
- I called one new folder “ADLS” the reason will become clear later
- The other mcaStandalone_R7-7, this name mirrors the .zip file you should have downloaded earlier
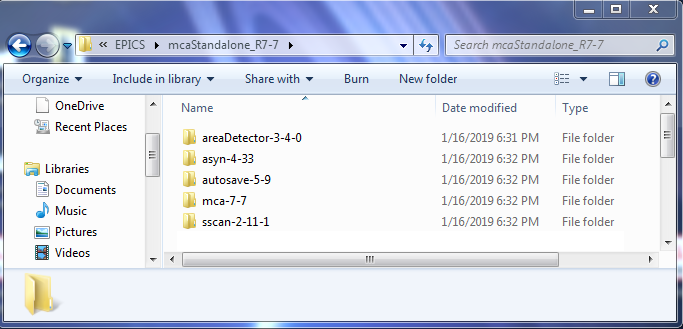
- Extract the mcaStandalone_R7-7.zip files into the folder you created
- if you dont know how to extract files google will help
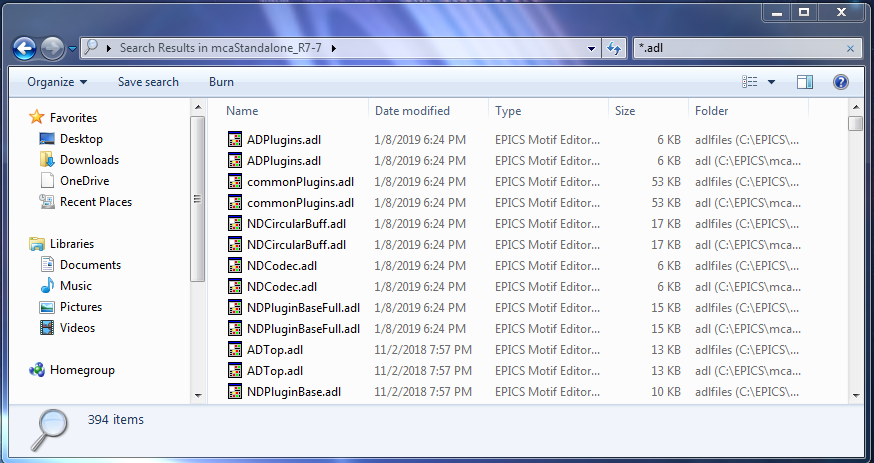
- The next step is to gather all the .adl files into one location
- Open the “mcaStandalone_R7-7” folder
- in the search bar type “*.adl”
- This searches for a particular file extension
- Copy all the files it finds and paste them into the “ADLS” file you created earlier
- ctrl-A will select all the files
- ctrl-C will copy the files
- ctrl-V will paste the files
Here are some pics to help you along
Testing Epics Windows Tools
- Open the commands prompt (CMD)
- Type “caget”
- You should receive a response
- “No PV name specified. <‘caget -h’ for help.>”

Run MobaXterm
- Locate and Run “MobaXterm.exe”
- Mine was located in”C:\Program Files (x86)\Mobatek\MobaXterm”
- A window should appear
- Minimize it, as we need it open, but do not need to do anything with it directly

Testing Medm
- In the EPICS WINDOWS TOOLS directory, locate and run “medm.exe”
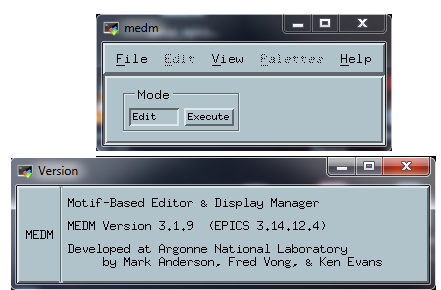
- if EPICS windows tools and the path was set correctly 2 small windows should open
- if they only open momentarily, something is wrong
Test EPICS itself
- Navigate to “C:\EPICS\mcaStandalone_R7-7\mca-7-7\bin\windows-x64-static”
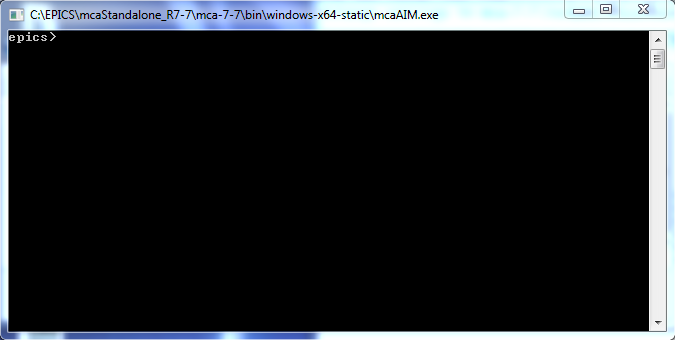
- run “mcaAIM.exe”
- the CMD should open with “epics>” displayed
- If it only opens momentarily, something is wrong
- type “exit” to leave EPICS
Create AutoSave Folder
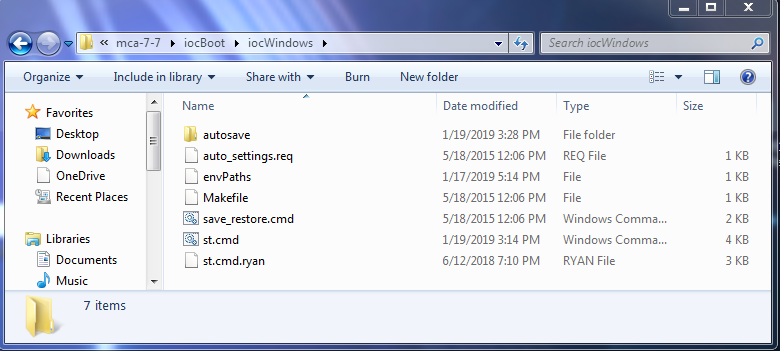
- Navigate to “C:\EPICS\mcaStandalone_R7-7\mca-7-7\iocBoot\iocWindows”
- Create a new folder called “autosave” if one does not already exist
Configure the EnvPaths File
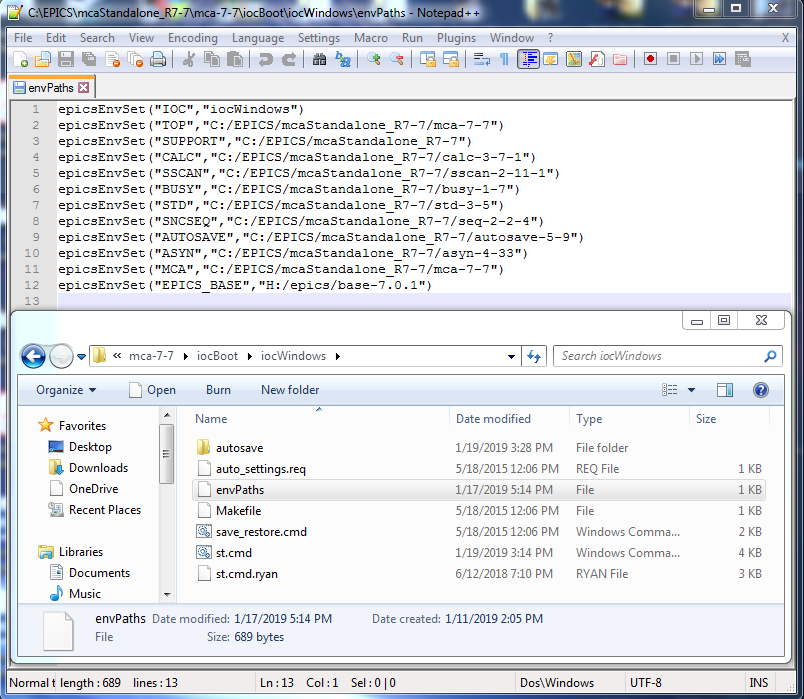
- Open “envPaths” with notepad++ (right click, edit with notepad++)
- Edit the paths to reflect the actual file locations (ie, change them all to be where you put all the extracted MCA folders)
- I extracted the MCA folders into the folder we created earlier “C:/EPICS/mcaStandalone_R7-7”
- NOTE: The “EPICS_BASE” path doesn’t matter, but change it anyway for completeness
- Note: Not all of the paths have folders in the mcaStandalone folder, but change all the directory’s anyway.
- Save and close envPaths
- Open “st.cmd” with Notepad++ (right click, edit with notepad++)
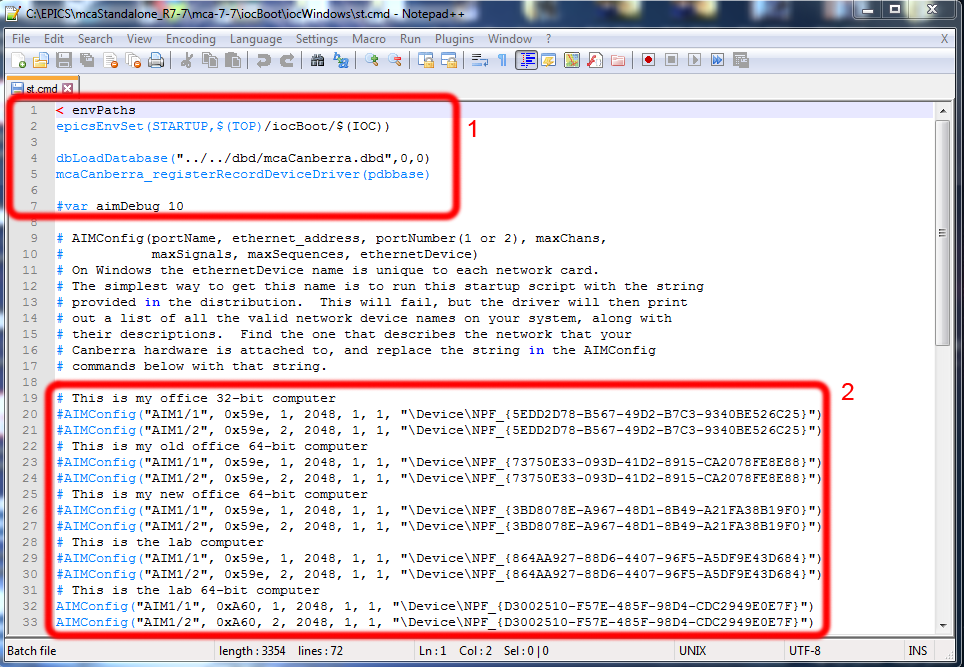
Prepare st.cmd
This step is so important it deserved it’s own section
You should still be in “C:\EPICS\mcaStandalone_R7-7\mca-7-7\iocBoot\iocWindows”, locate and open “st.cmd”.
Note: The st.CMD files for the R_10 version needed when using Windows 11 are slightly different than the st.CMD files needed for the R_7 version. Don’t just copy this file from the other version, go thru and manually create a new one from the template.
Lets start with what “st.cmd” is; effectively its a set of commands what will run in the command prompt, the commands link EPICS thru mobaXterm to the AIM
Just looking at “st.cmd”, it appears that there is a lot going on.
It can be broken down into several sub categories.
- Initialization
- AIM Configuration
- Database Configuration
- ICB configuration
st.cmd also does a good job with its own internal descriptions, which I will mirror in part on this page.
- The file structures we care about look like this
- AIMConfig(portName, ethernetAddress, PortNumber(1 or 2), maxChannels, maxSignals,maxSequences, ethernetDeviceID)
- icbConfig(portName, module, ethernetAddress, IcbAddress, moduleType)
- You also need to care about the NCHAN parameter in dbload records.
Thankfully, we only need to alter a few things in the file.
For starters.
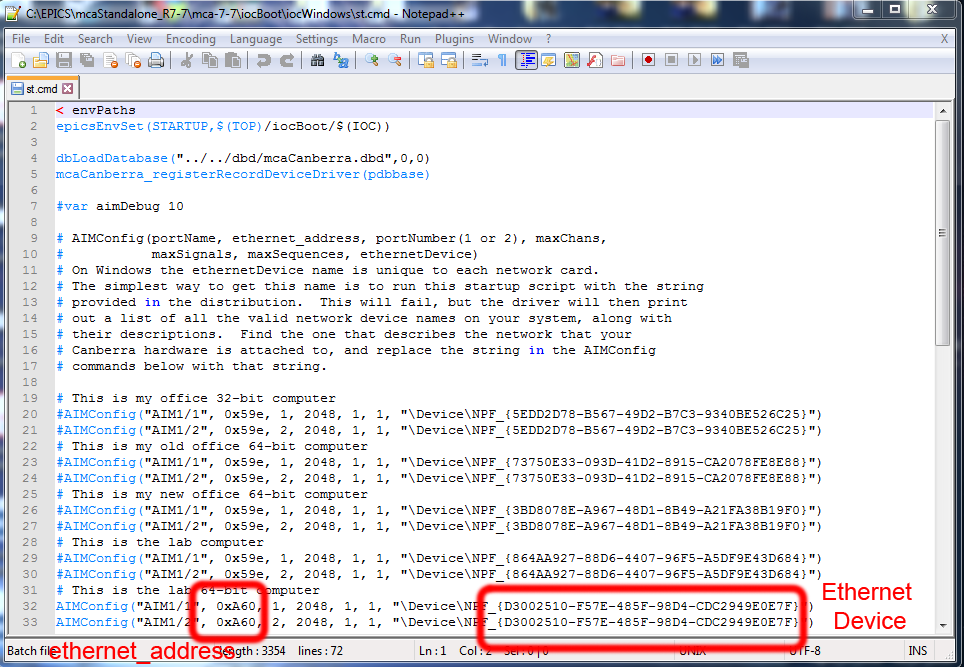
- The 556’s Ethernet device address
- This is specific to your AIM
- The ethernet device ID
- This is specific to your computer
- Whatever ICB devices you use need to be configured
- specific to your NIM modules
- You’ll need to set the max numbers of channels as well
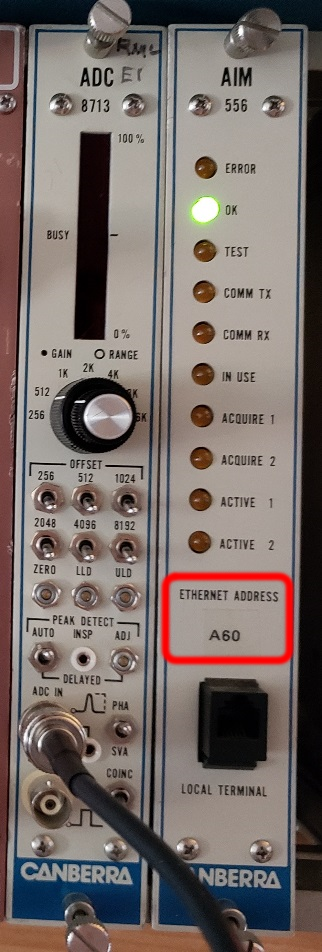
- The first step is to get the 556’s Ethernet address
- That’s fairly easy, as its on the front of your AIM module.
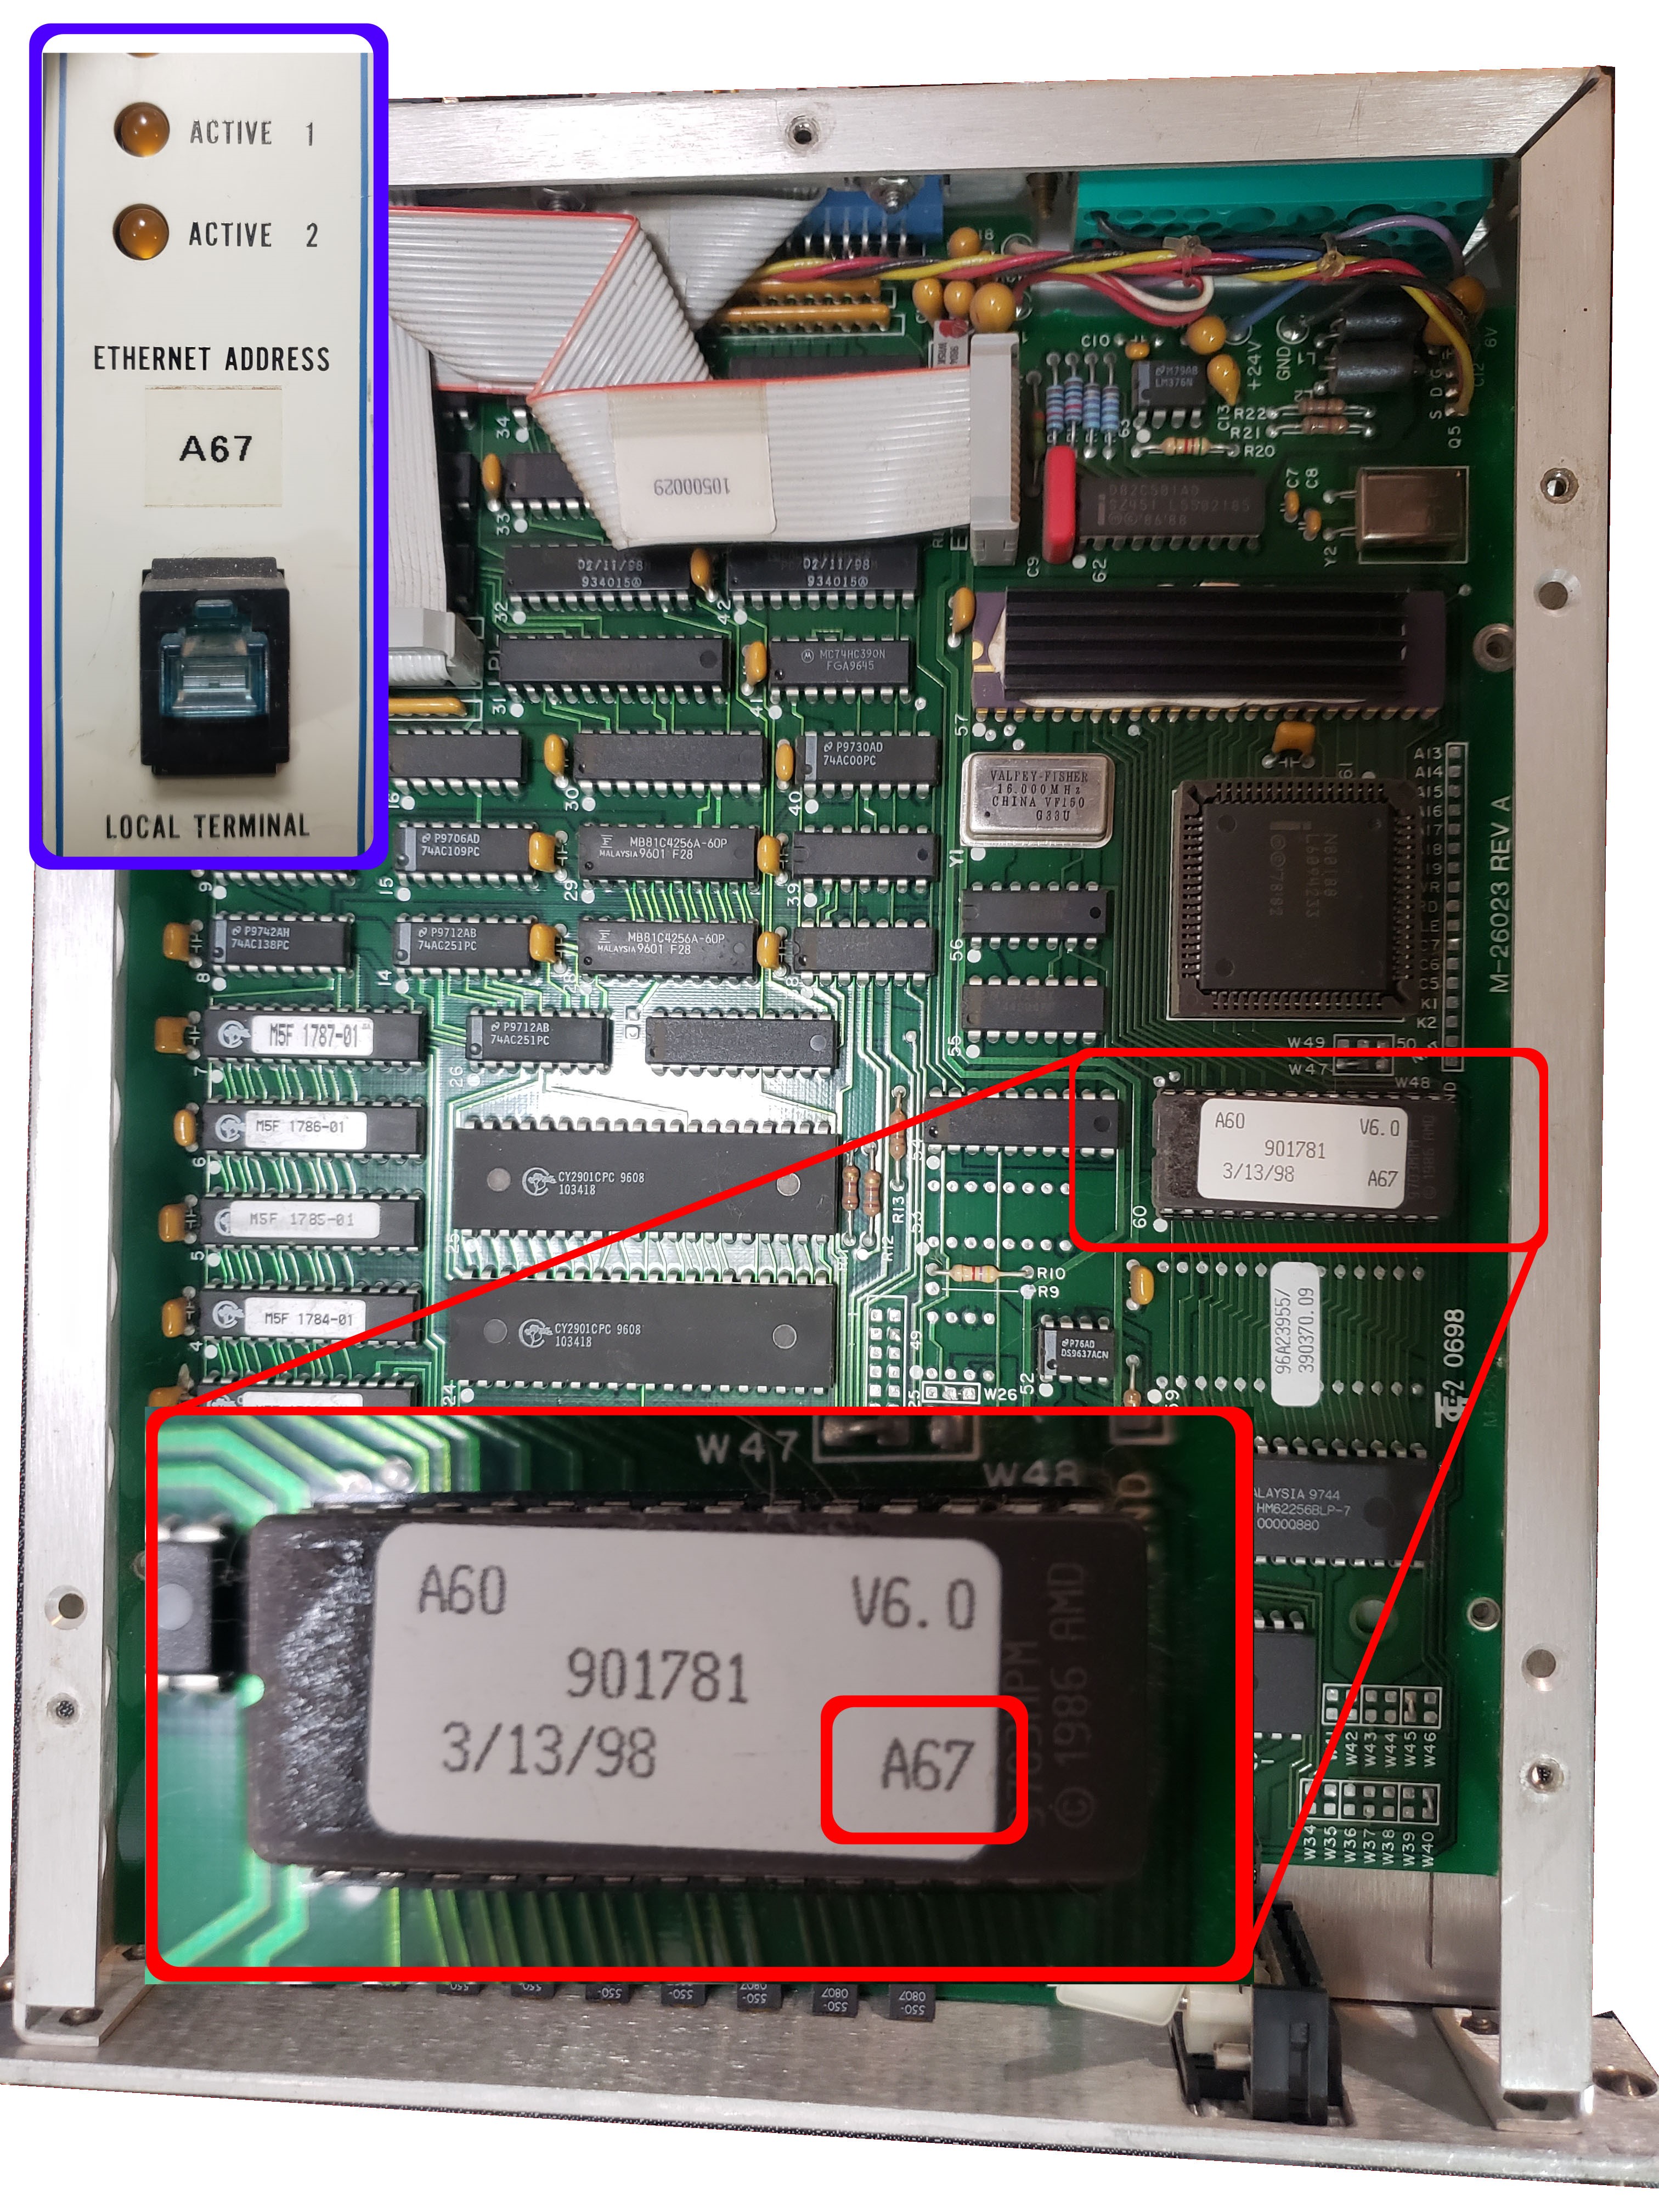
- If its been scraped off or is absent for whatever reason there are 2 options for you
- Open the unit, and hope its printed on the chip as discovered by our good friend Jim.
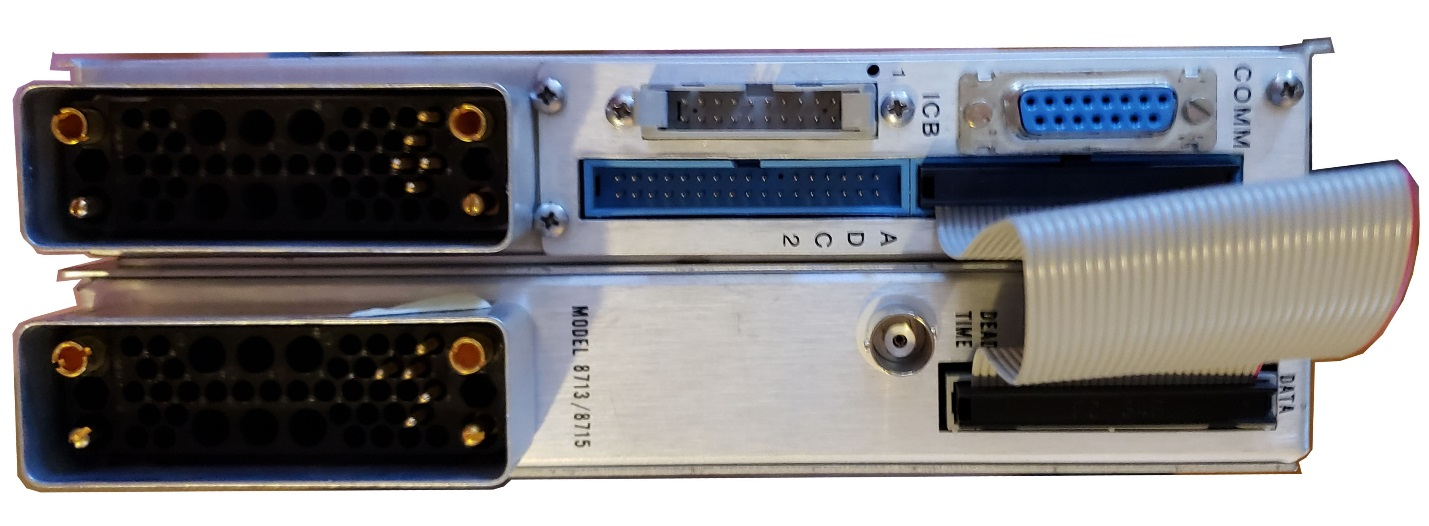
- See image Below for where to look
- Recover the ID via the local terminal of the 556 (port on the front of the device)
- A friend named Lucian figured out you can use software called Putty https://www.putty.org/ to access the local terminal of the 556 using an RS232 protocol and recover the Ethernet address with some cable building trickery. https://www.madexp.com/2021/05/14/556-aim-eth
- I also copied that info to a .pdf just in case his web page ever disappeared. Found here Canberra_556 AIM Ethernet address recovery procedure
- Open the unit, and hope its printed on the chip as discovered by our good friend Jim.
- Located on the rear of the DSA-2000, if you are using one of those
- we need to replace (the “0xA60” for example) with whatever your AIM modules address is, in both the “icbConfig” and “AIMConfig” fields
- Note: a “#” in front of a line means its commented out and inactive
- Note: you only need to change 2 lines for AIMConfig, “AIM1/1” and “AIM1/2”. (this because 1 AIM has 2 ADC ports.) I picked the bottom 2 in the list to change.
- Note: you can just delete the AIMconfig lines that you’re not using. Unless you intend to try and run multiple AIM boxes at a time… (unlikely for an at home user)
- Make sure the 2 lines you change are not commented out
- You will also note other parameters in the AIMConfig fields
The Ethernet_Device_ID
Getting your Ethernet Device ID is a bit trickier. But with trickery we can find it without too much pain. We will let EPICS do the finding for us.
- Open the command prompt
- you will need to change the directory to the iocWindows folder
- type
- “cd C:\EPICS\mcaStandalone_R7-7\mca-7-7\iocBoot\iocWindows”

- now you need to run the mcaAIM executable from the iocWindows folder, with the st.cmd file tacked on to the end. for me this command looks like
- “..\..\bin\windows-x64-static\mcaAIM st.cmd”
- the “..\..\” moves us up 2 directories and then you start going back down in directories “\bin\..etc” eventually calling mcaAIM
- Putting a space and then typing “st.cmd” opens the file along with the mcaAIM.exe, executing the commands found within.
- Note the lack of “cd” in the command set. We did not change the current directory. We simply accessed another directory from our current directory.
- Being not a computer person, I had no idea you could do things like this…
- “..\..\bin\windows-x64-static\mcaAIM st.cmd”
- Now a CMD window will open, and a ton of stuff is going to happen
- if it doesn’t something is wrong…
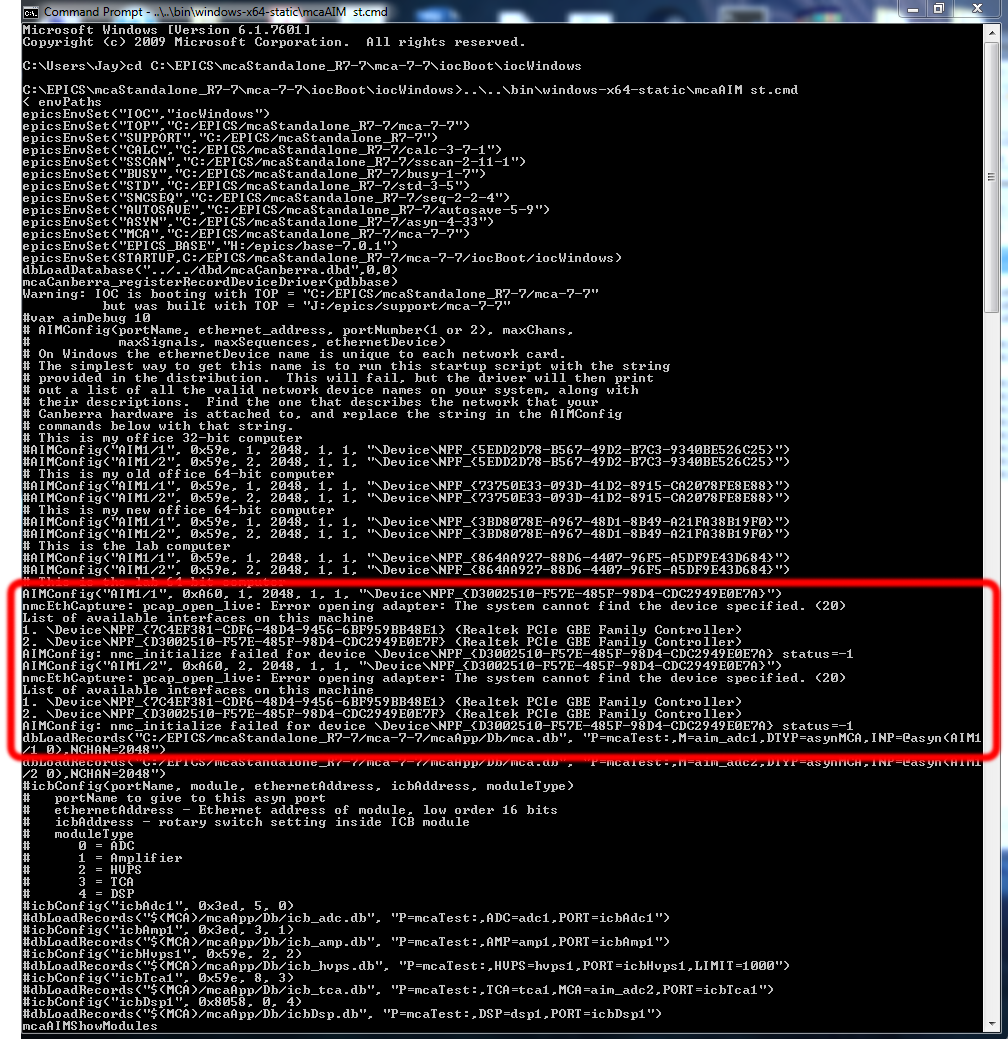
- The only thing we really care about here is that it failed
- But failure is a good thing, as in failing it told us the available Ethernet device ID’s
- my computer lists 2 ID’s
- one is the Ethernet port on my motherboard which is connected to my wifi router / switch
- The other is a network card I installed specifically to support the direct connect requirement the AIM needs.
- I Placed each ID into my st.cmd file separately and repeated the above steps to find out if it worked or not. turns out the 2nd one was correct.
- The first number showed me


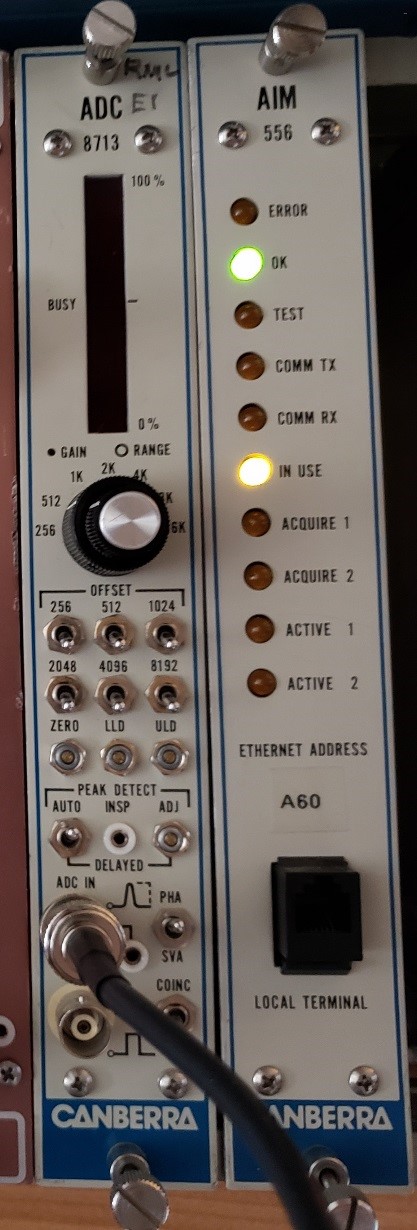
- A correct choice will also alter the state of the AIM unit itself, displaying an “In Use” light
Adjusting Max Channels
- You will need to specify the channels via the dbLoadRecords field as well as the channels field in the AIMConfig field.
- In dbLoadRecords the “NCHAN=####” parameter
- This is the channels your AIM will read from the ACD and display.
- Your options are in multiples of 2 starting at 256.
- 256, 512, 1024, 2048, 4096, 8192, 16384.
- Note, the actual capability will be limited to your ADCs capability
- Also, side note using too many channels is silly,
- Scintillators should use 1024 or 2048.
- HPGe’s should use 4096, 8192, or in rare cases 16384.
- Note, there are 2 lines of dbLoadRecords, one for each ADC port on the rear of the AIM.
- Similarly in the AIMConfig the Maxchannels number needs to be set
- This is where you set the max capability of your ADC.
- Or, the max capability you intend to utilize.
- You will need to restart the AIM, and the software on the computer to enable these changes
Setting the ICB bus settings in st.cmd
The instrument control bus (ICB) is a neat digital control scheme which lets you control ICB enabled modules from the computer. Its useful in that it enables remote control
- Each ICB enabled device has a specific address
- this address is user adjustable, within a predetermined range
- the address is found on the NIM module
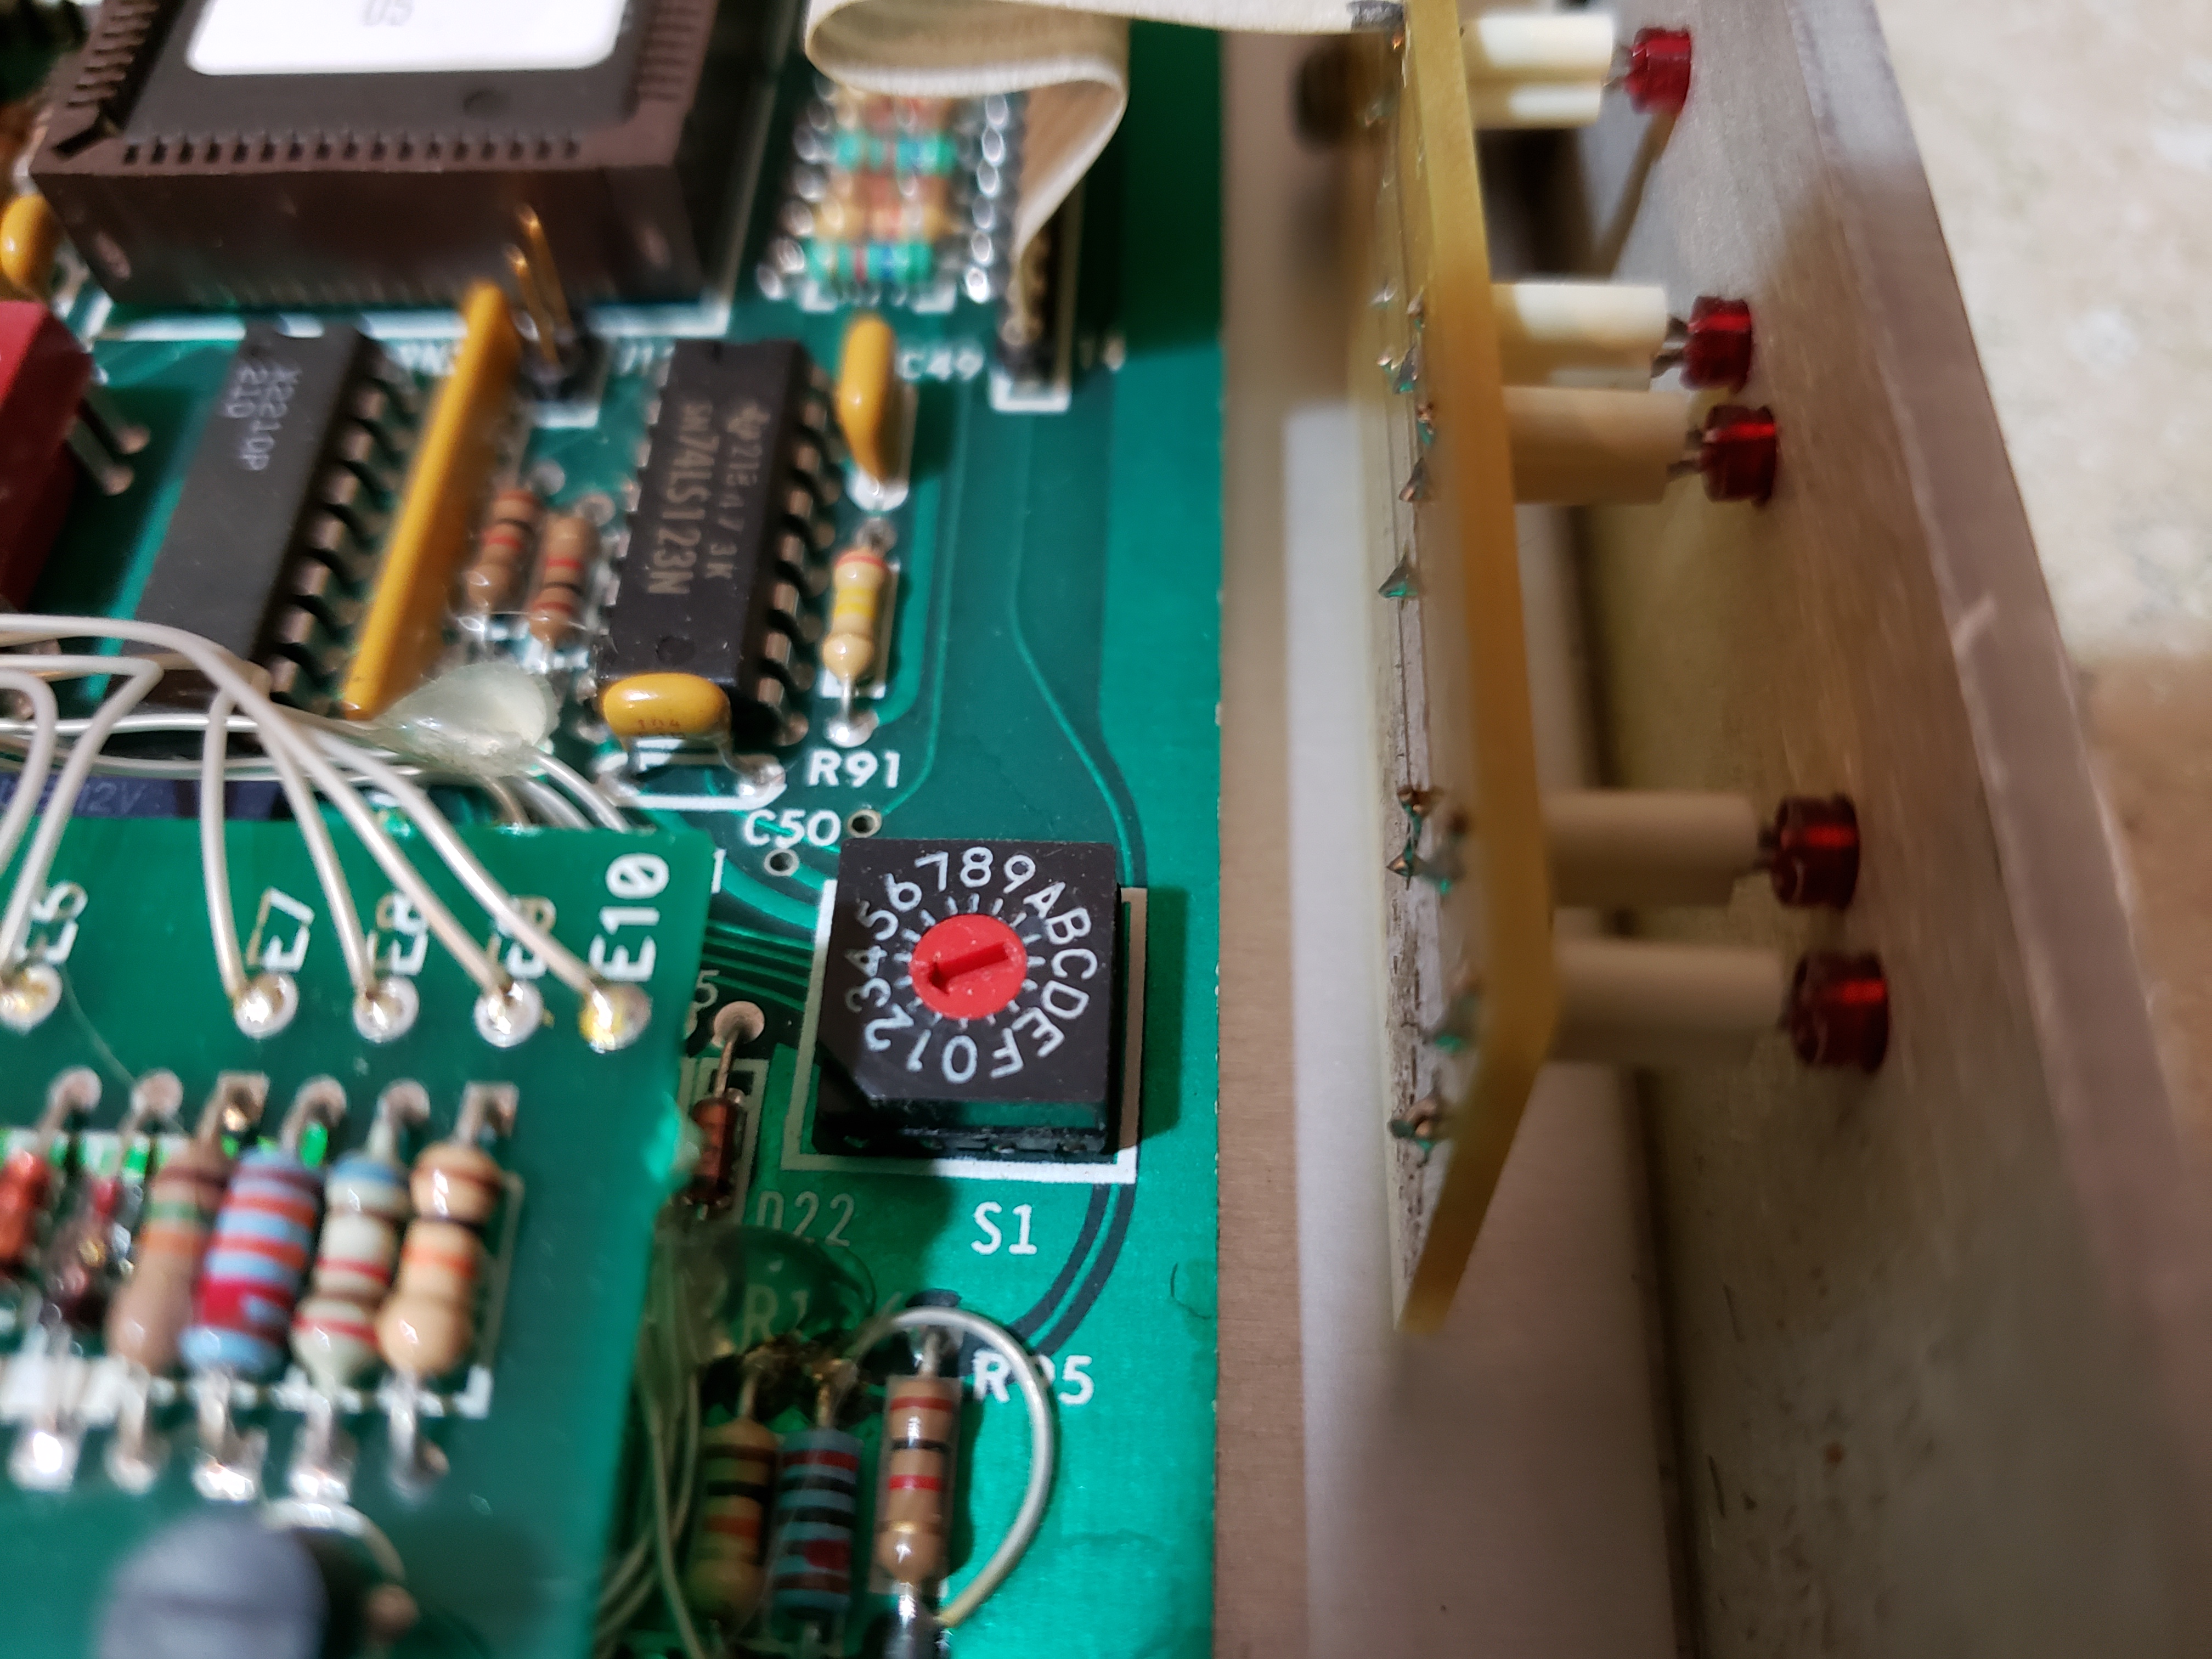
- Look for a hole on the nim module,
- inside should be a little indexed trim pot type object
- The arrow points to your devices address
- Note: you cannot have 2 of the same address on one ICB bus
- Make adjustments if necessary

- icbConfig(“portName”, module, ethernetAddress, icbAddress, moduleType)
- portname = “icbAdc1″,”icbAmp1″,”icbHVPS1”, etc
- if you had say 2 HVPS units increment the number “icbHVPS2”
- ethernetAddress = the value found on the AIM
- IcbAddress = the value found above
- ModuleType: “0”=ADC, “1”=Amplifier,”2″=HVPS, “3”=TCA, “4”=DSP
- portname = “icbAdc1″,”icbAmp1″,”icbHVPS1”, etc
- Don’t forget to uncomment active icb modules
- You will need to restart the AIM, and the software on the computer to enable these changes
Here is some code if you need to copy (you shouldn’t, as its already in the file, you just need to change parameters)
AIMConfig("AIM1/1", 0xA60, 1, 8192, 1, 1, "\Device\NPF_{D3002510-F57E-485F-98D4-CDC2949E0E7F}")
AIMConfig("AIM1/2", 0xA60, 2, 8192, 1, 1, "\Device\NPF_{D3002510-F57E-485F-98D4-CDC2949E0E7F}")

dbLoadRecords("$(MCA)/mcaApp/Db/mca.db", "P=mcaTest:,M=aim_adc1,DTYP=asynMCA,INP=@asyn(AIM1/1 0),NCHAN=4096")
dbLoadRecords("$(MCA)/mcaApp/Db/mca.db", "P=mcaTest:,M=aim_adc2,DTYP=asynMCA,INP=@asyn(AIM1/2 0),NCHAN=2048")

icbConfig("icbAdc1", 0xA60, 0, 0)
dbLoadRecords("$(MCA)/mcaApp/Db/icb_adc.db", "P=mcaTest:,ADC=adc1,PORT=icbAdc1")

icbConfig("icbAmp1", 0xA60, 2, 1)
dbLoadRecords("$(MCA)/mcaApp/Db/icb_amp.db", "P=mcaTest:,AMP=amp1,PORT=icbAmp1")

icbConfig("icbHvps1", 0xA60, 4, 2)
dbLoadRecords("$(MCA)/mcaApp/Db/icb_hvps.db", "P=mcaTest:,HVPS=hvps1,PORT=icbHvps1,LIMIT=2000")
DSA-2000 st.cmd
- Preparing the st.cmd file for a DSA unit is much the same
- Read the address off the units rear,
- get the Ethernet device ID
- etc, refer up this page a little for more info
- modify stuff in the st.cmd file
- once again, refer up the page for more info
- You will need to specify a different HV config
- DSA2000Config(“DSA2000”, 0x829F)
- and load the records for it
- As well as load a DSP specific ICB unit.
- icbConfig(“icbDsp1”, 0x829F, 0, 4)
look at the source material if you have further questions
https://cars9.uchicago.edu/software/epics/mcaCanberra.html
AIMConfig("AIM1/1", 0x829F, 1, 2048, 1, 1, "\Device\NPF_{D3002510-F57E-485F-98D4-CDC2949E0E7F}")
dbLoadRecords("$(MCA)/mcaApp/Db/mca.db", "P=mcaTest:,M=aim_adc1,DTYP=asynMCA,INP=@asyn(AIM1/1 0),NCHAN=2048")

icbConfig("icbDsp1", 0x829F, 0, 4)
dbLoadRecords("$(MCA)/mcaApp/Db/icbDsp.db", "P=mcaTest:,DSP=dsp1,PORT=icbDsp1")

DSA2000Config("DSA2000", 0x829F)
dbLoadRecords("$(MCA)/mcaApp/Db/DSA2000_HVPS.db", "P=mcaTest:,HVPS=hvps1:,PORT=DSA2000,LIMIT=2000")
Save Restore Setup
(Section Added in March of 2024)
When expanding your capability beyond what is typical; using more than 1 of the same module type, using the DSA-2000, multiple AIM units, etc. You will find that you consistently get errors related to save restore not connecting for the new modules. This is because there is an additional step necessary to configure save_restore.
- First navigate to the iocWindows folder (same folder where st.CMD is located
- Locate auto_settings.req and open with notepad
- Duplicate and rename the module names to reflect what you have defined in st.CMD
- Comment out items not being used with a #
- Your version will probably not include the DSA-2000 specific fields. I have included them below
file "mca_settings.req",            P=$(P), M=aim_adc1
file "mca_settings.req",            P=$(P), M=aim_adc2
file "icb_amp_settings.req",        P=$(P), AMP=amp1
file "icb_adc_settings.req",        P=$(P), ADC=adc1
file "icb_hvps_settings.req",       P=$(P), HVPS=hvps1
# file "icb_tca_settings.req",        P=$(P), TCA=tca1
# file "icbDsp_settings.req",         P=$(P), DSP=dsp1
# file "DSA2000_HVPS_settings.req",   P=$(P), HVPS=hvps3:
Issuing your First Commands
Now that you have everything working, its time to try and control the module, learn to read data. The basic method is to issue a console command. Later we will use some build in software to make it easier.
Now that everything is installed, lets start up from scratch
- Turn on both the computer and the NIM-BIN
- run mobaXterm
- Run the mcaAIM st.cmd as described above
- Note: I find it convenient to use a batch file to just do this for me. You will have to edit the paths, but here is an example.
- exampleCommandFile.CMD
- Open the command prompt (CMD)
- type “caput mcaTest:AIM_adc1EraseStart 1”
- You should notice that your AIM now has some more lights on, and appears to be acquiring
- type “caput mcaTest:AIM_adc1Stop 1”
- it should stop and return to an idle state
- Type “caget mcaTest:aim_adc1Read”
- you should get a flood of number, channels and counts
- if you have opted to use a high channel number it might scroll for quite some time.
- You can direct the data to save file like so
- type “caget mcaTest:aim_adc1 > C:\EPICS\mcaStandalone_R7-7\Cs-137.txt”
- Adjusting the path to your liking of course
CA.Client Exception
(Section added in March 2024)
Depending on the computer configuration you may encounter a specific “CA.Client.Exception Identical process variable names on multiple servers” error (which doesn’t seem to hurt anything, but is very annoying)
I reached out of Mark and he indicates…
That warning happens under the following circumstances:
- The Channel Access server (the IOC) and the Channel Access client (medm, IDL, etc.) are running on the same machine.
- The machine has more than one network card.
- The EPICS_CA_AUTO_ADDR_LIST and EPICS_CA_ADDR_LIST environment variables are not defined or are defined to use the normal setting of searching all networks for EPICS PVs.
The problem arises because local PVs appear to be coming from multiple network adapters, so they are duplicated.
The solution is easy. Set the environment variables as follows:
- EPICS_CA_AUTO_ADDR_LIST set to NO
- EPICS_CA_ADDR_LIST set to the broadcast address of one of the network cards. If all PVs are local (none on other machines), then you can chose either of your network card subnets. If some PVs are remote then you need to use the broadcast address of the subnet that the remote machines are using. In your case you might set it to ###.###.#.255, assuming that subnet has a mask of 255.255.255.0
Thus adding the below should resolve the issue.
Again; it doesn’t effect anything, its just annoying.
epicsEnvSet EPICS_CA_AUTO_ADDR_LIST NO
epicsEnvSet EPICS_CA_ADDR_LIST ###.###.#.255
#   ###.###.#.255 = the ip address of your AIM unit
Using the built in MCA, medm
Medm is a graphical run time environment built into EPICS, its simple and its gets the job done. This is the easiest way to get the canberra modules going.
If you have been following the tutorial, you already opened it once. Lets do it again and take it a few steps deeper.
- Turn on both the computer and the NIM-BIN
- run mobaXterm
- Run the mcaAIM st.cmd as described above
- Note: I find it convenient to use a batch file to just do this for me. You will have to edit the paths, but here is an example.
- exampleCommandFile.CMD
- Run medm.exe found in EPICS windows tools folder
- note, the linked command file includes example commands for medm too
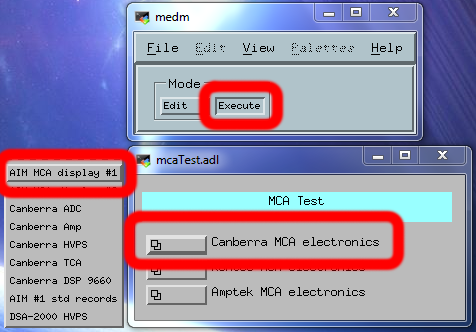
- It usually starts up with “Edit” selected
- Change that to “Execute”
- Then select the “Canberra MCA electronics”
- Choose “AIM MCA display #1” from the list
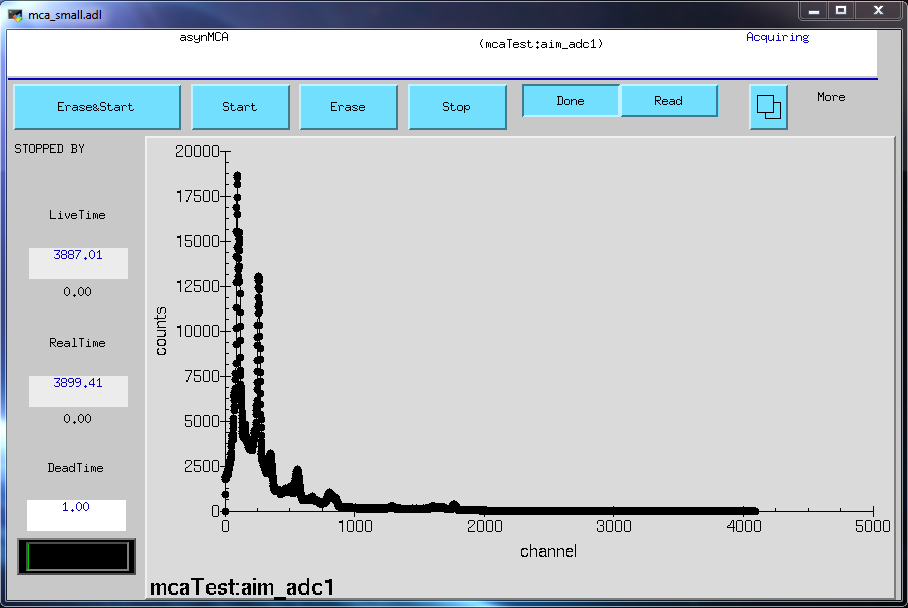
- The MCA will flash up a window that will run thru a bunch of commands, then open a GUI
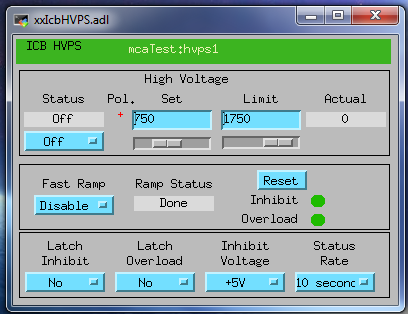
- You may also select an ICB device from the list, if you are using one.
- You will note the myriad of control and options found in the Medm MCA, each control correlates to a specific parameter channel the AIM offers.
- When you click a button, you call the database (.dB files) which stores the command sets. then transmits the command to the AIM, waiting for a reply or data if necessary.
- I leave it to you to explore the software an discover it capabilities.
The IDL MCA
Not because its really any fancier. The IDL MCA requires you to download the IDL run-time environment. Which have an annoyingly high level of difficulty when trying to get the freeware from the company. It took me 2 weeks and a few emails to get them to approve my account. You also must be a US citizen. It is nicer than the medm MCA in my opinion. But still lacks certain functionality. They mentioned “thinking” of making a standalone run-time environment which did not require an account to download, I have not checked to find out if they did or not.
you can find the software here
https://www.harrisgeospatial.com/Support/Self-Help-Tools/Help-Articles/Help-Articles-Detail/ArtMID/10220/ArticleID/17309/The-IDL-Virtual-Machine
- Advantages of the IDL
- It looks nicer than Medm
- Disadvantages
- You still need Medm for ICB support
- Have to be a US citizen to get the run time environment
- Download an install the IDL virtual machine software from harris geospatial
- Download the IDL_MCA.tar file listed in downloads
- Create a new folder in the EPICS folder you created earlier
- unzip the tar file into the new folder folder you created earlier
- my new folder is conveniently called idl_mca
- Follow the instruction previously described to add EZCA_IDL_SHARE as a system path variable
- Turn on both the computer and the NIM-BIN.
- Run mobaXterm.
- Run the mcaAIM st.cmd as described previously.
- Note: I find it convenient to use a batch file to just do this for me. You will have to edit the paths, but here is an example.
- exampleCommandFile.CMD .
- Run “mca.sav” found in an IDL Sub-folder.
- Note, the linked command file includes example commands for IDL too.
- Click to continue
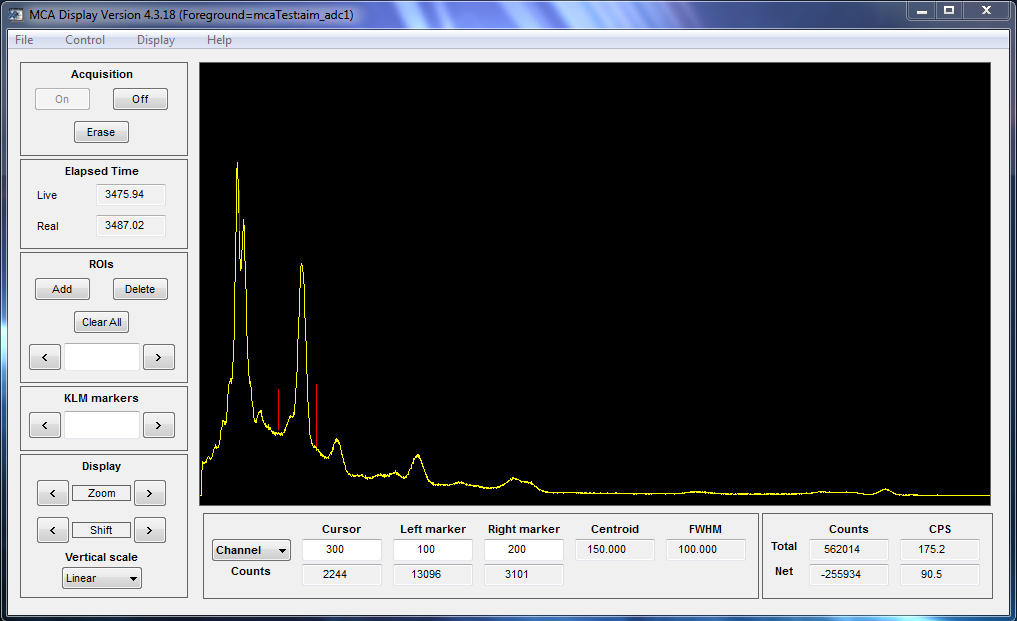
- A nice looking MCA window will open up
- I leave it to you to explore the software and discover its capabilities
The DIY method
As mentioned at the beginning of this page, several people have gotten this method of control to work with the Canberra modules previously. You can count them on one hand. I think everyone can agree that the freeware available is somewhat lacking. So users develop their one MCA’s. One user built an MCA in Labview, for example.
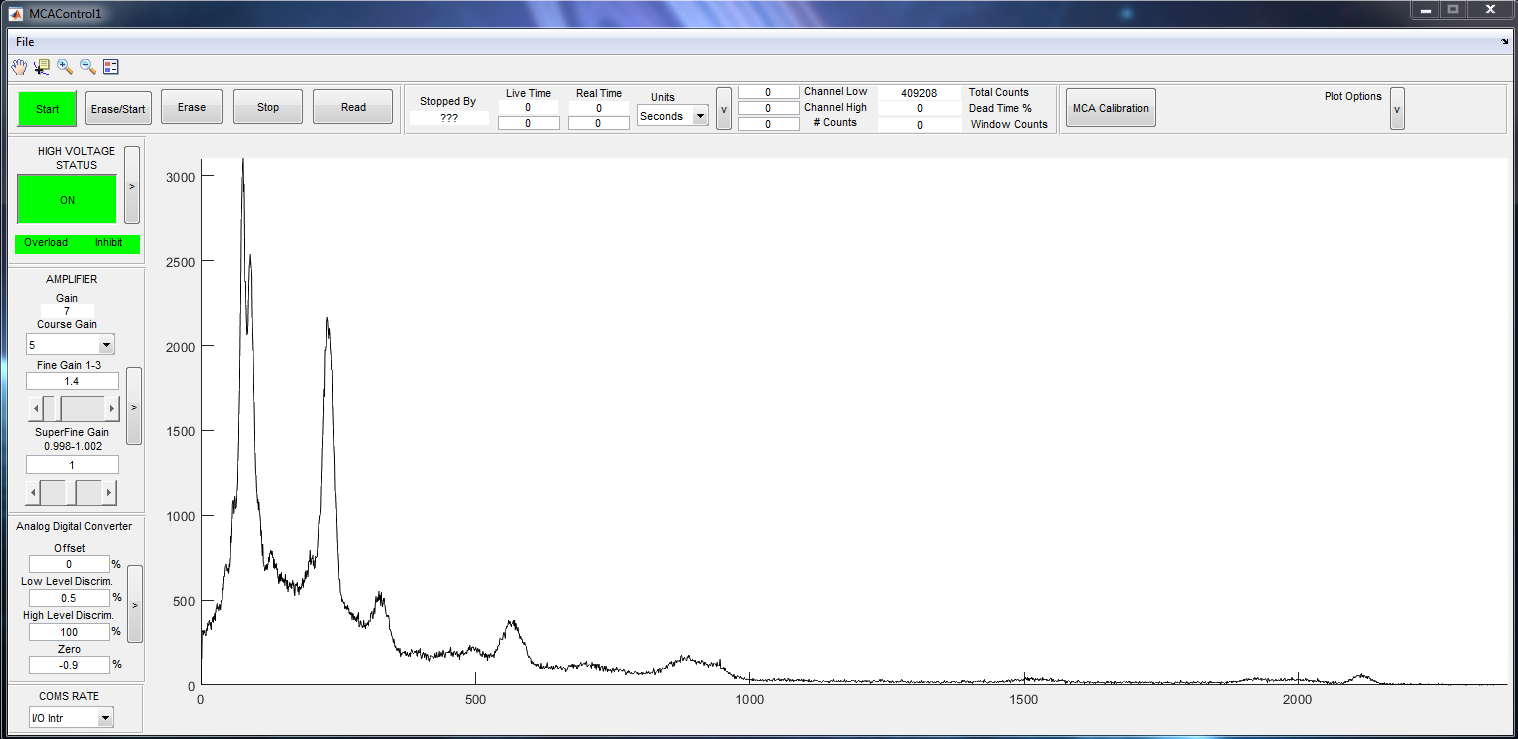
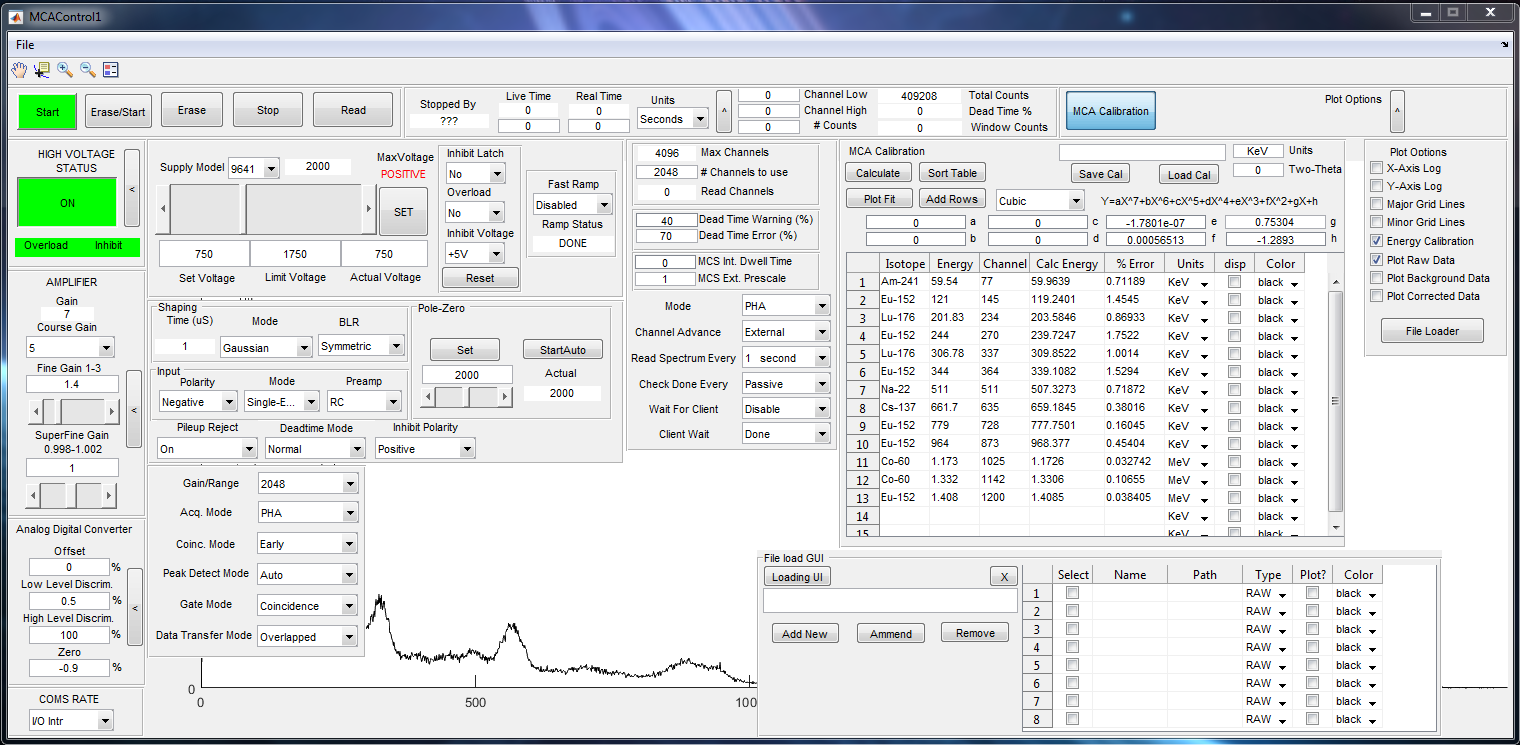
While familiar with lab view, I am much more familiarized with MATLAB due to my profession. So I set out to make my own MCA software in the MATLAB environment. It is still a work in progress, and gets more sophisticated with every line of code I type.
Learn more by clicking here.
