
Refurbishment of LN2 Dewars
Author: Jay Howson
Date: 3/15/2020
Quick Links
Intro
I was gifted a trio of LN2 (liquid nitrogen) dewars which had lost their vacuum (to an unacceptable degree) for one reason or another, probably a combination of age, the valve, perhaps a microcrack in a weld or two. Not really sure. I decided to try and refurbish them, such that I could utilize for an HPGe system. Even if I have to re-pump the vacuum once a year, that is completely manageable. We will see how it goes.
How LN2 Dewars Work
The way LN2 dewars work to keep the liquid nitrogen cold, is by using a vacuum as an insulator between 2 vessels. The level of vacuum isn’t terribly deep, typically in the double digit mTorr range (correct me if I am wrong on that).
The vacuum is aided by a fibrous insulation attached to the exterior circumference of the inner vessel. You might think this insulation behaves like the insulation within your homes walls, but in fact the fiberglass home insulation works by slowing down the motion of air in the walls, thus reducing thermal transfer thru that medium.
This fibrous insulation works in vacuum, thus there is very little air to slow down thermal transfer within. Instead this insulation cools down with the inner vessel when the LN2 is added. Being fibrous, the insulation’s surface area to mass ratio is extremely high; this has the effect to providing a massive cold surface area within the vacuum. Acting very much like a cryo-pump the insulation absorbs any contaminants further reduces the pressure within the interstitial volume of the dewar, increasing the ability to provide thermal insulation.
The Conundrum
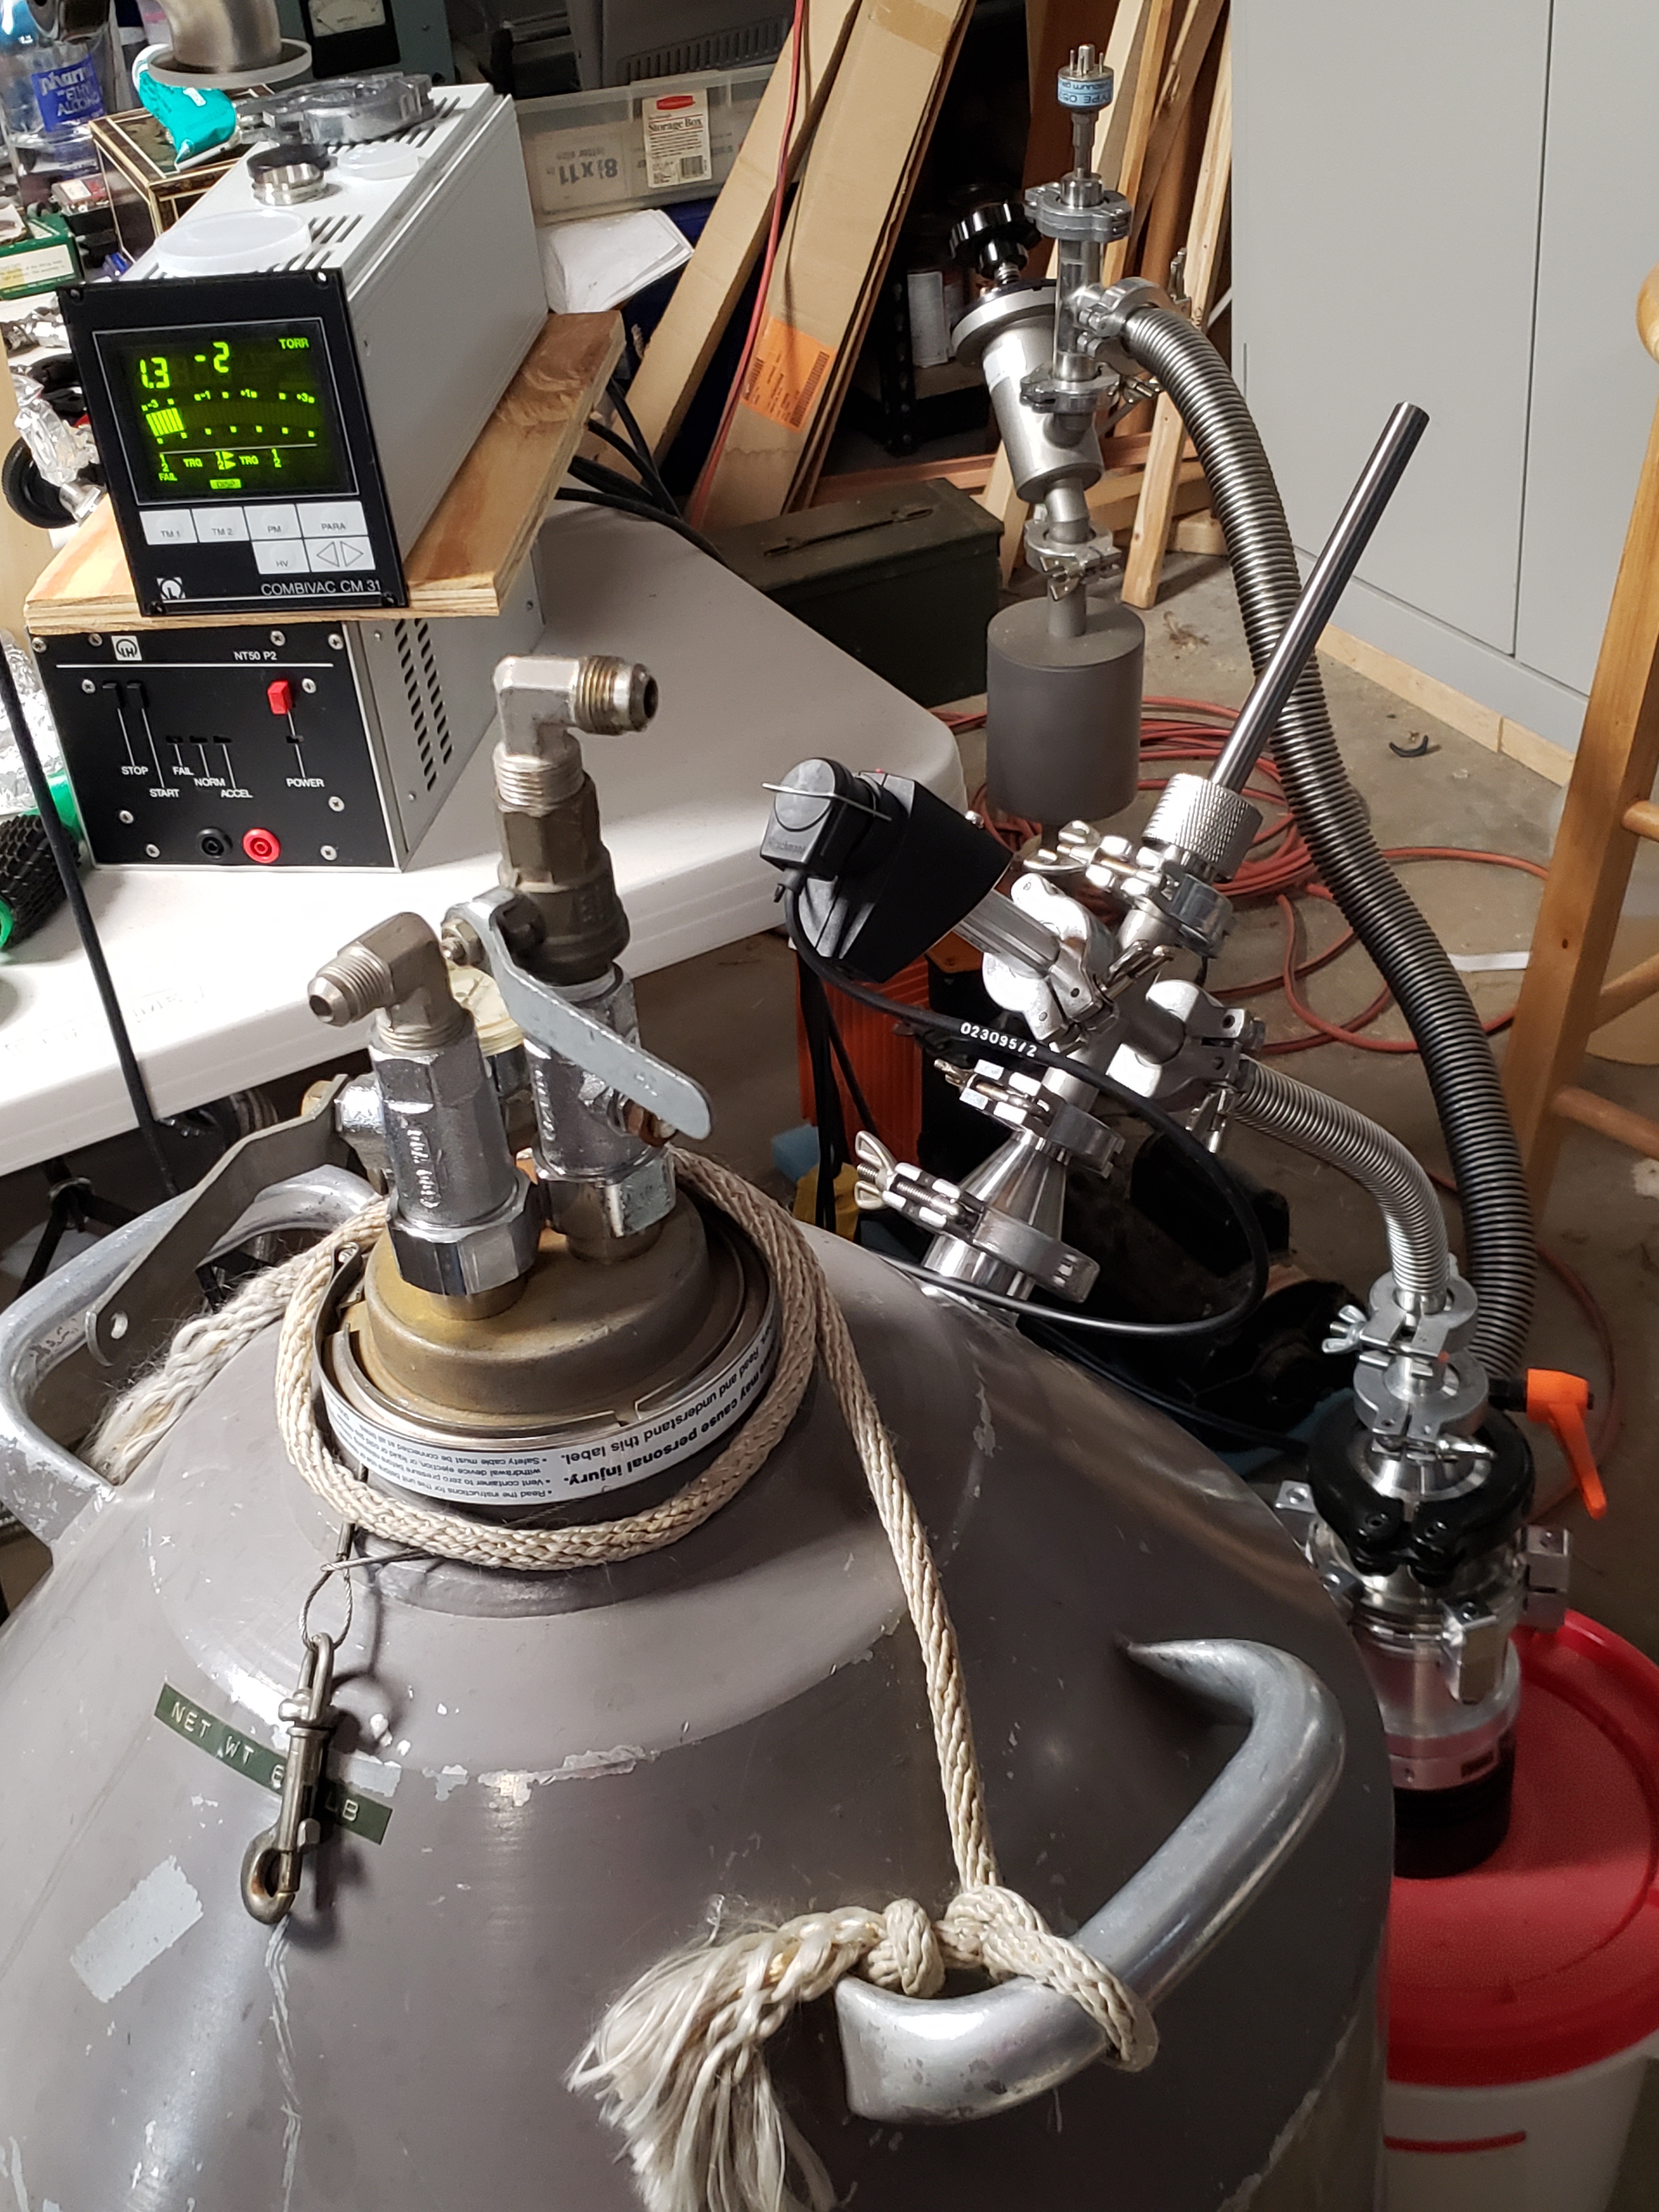
In order to service the vacuum on a dewar you need a special adapter which provides a seal around the dewars port. while simultaneously providing a threaded linear actuator enabling the operator to remove a gasket-ed plug that seals the port.
This device is called a valve adapter. Unfortunately they are very expensive. I was quoted $900 for one that adapts to a 5/8″ port. And I had 3 different port sizes on my dewars. (a problem with dewars, the manufacturers can’t seem to make up their minds on what port style they want)
I however have a reasonable assortment of vacuum components. A pair of Wilson seals, one around the port and one around an actuator rod. Would provide an ideal way to make my own valve adapter. Unfortunately the outer diameters of the 3 ports were all sizes I did not have a Wilson seal for. They are fairly hard to locate of ebay, and buying 3 different sized Wilson seals new would also cost hundreds of dollars.
I was able to locate a 5/8″ seal for 15 bucks which fits on the smallest port. But the other two were far larger (1-3/16 and 1-3/8).

A DIY Valve Adaptor Solution
I eventually decided that I was going to be the only person ever servicing these dewars, I intend to use them for quite some time, and have no plans to resell. Thus a little modification to the dewar wasn’t going to hurt anyone.
Flange Adaptor
I fortuitously procured 2 KF40 blank studs from LDS Vacuum when they were on sale, and proceeded to bore them out to 1-3/16″ and 1-3/8″. I also procured some Torr-Seal equivalent epoxy when it too was on sale. Slathering up the dewars valve stem and slipping the KF40 was easy enough, some alcohol was used to clean things up a bit and it was left to cure.
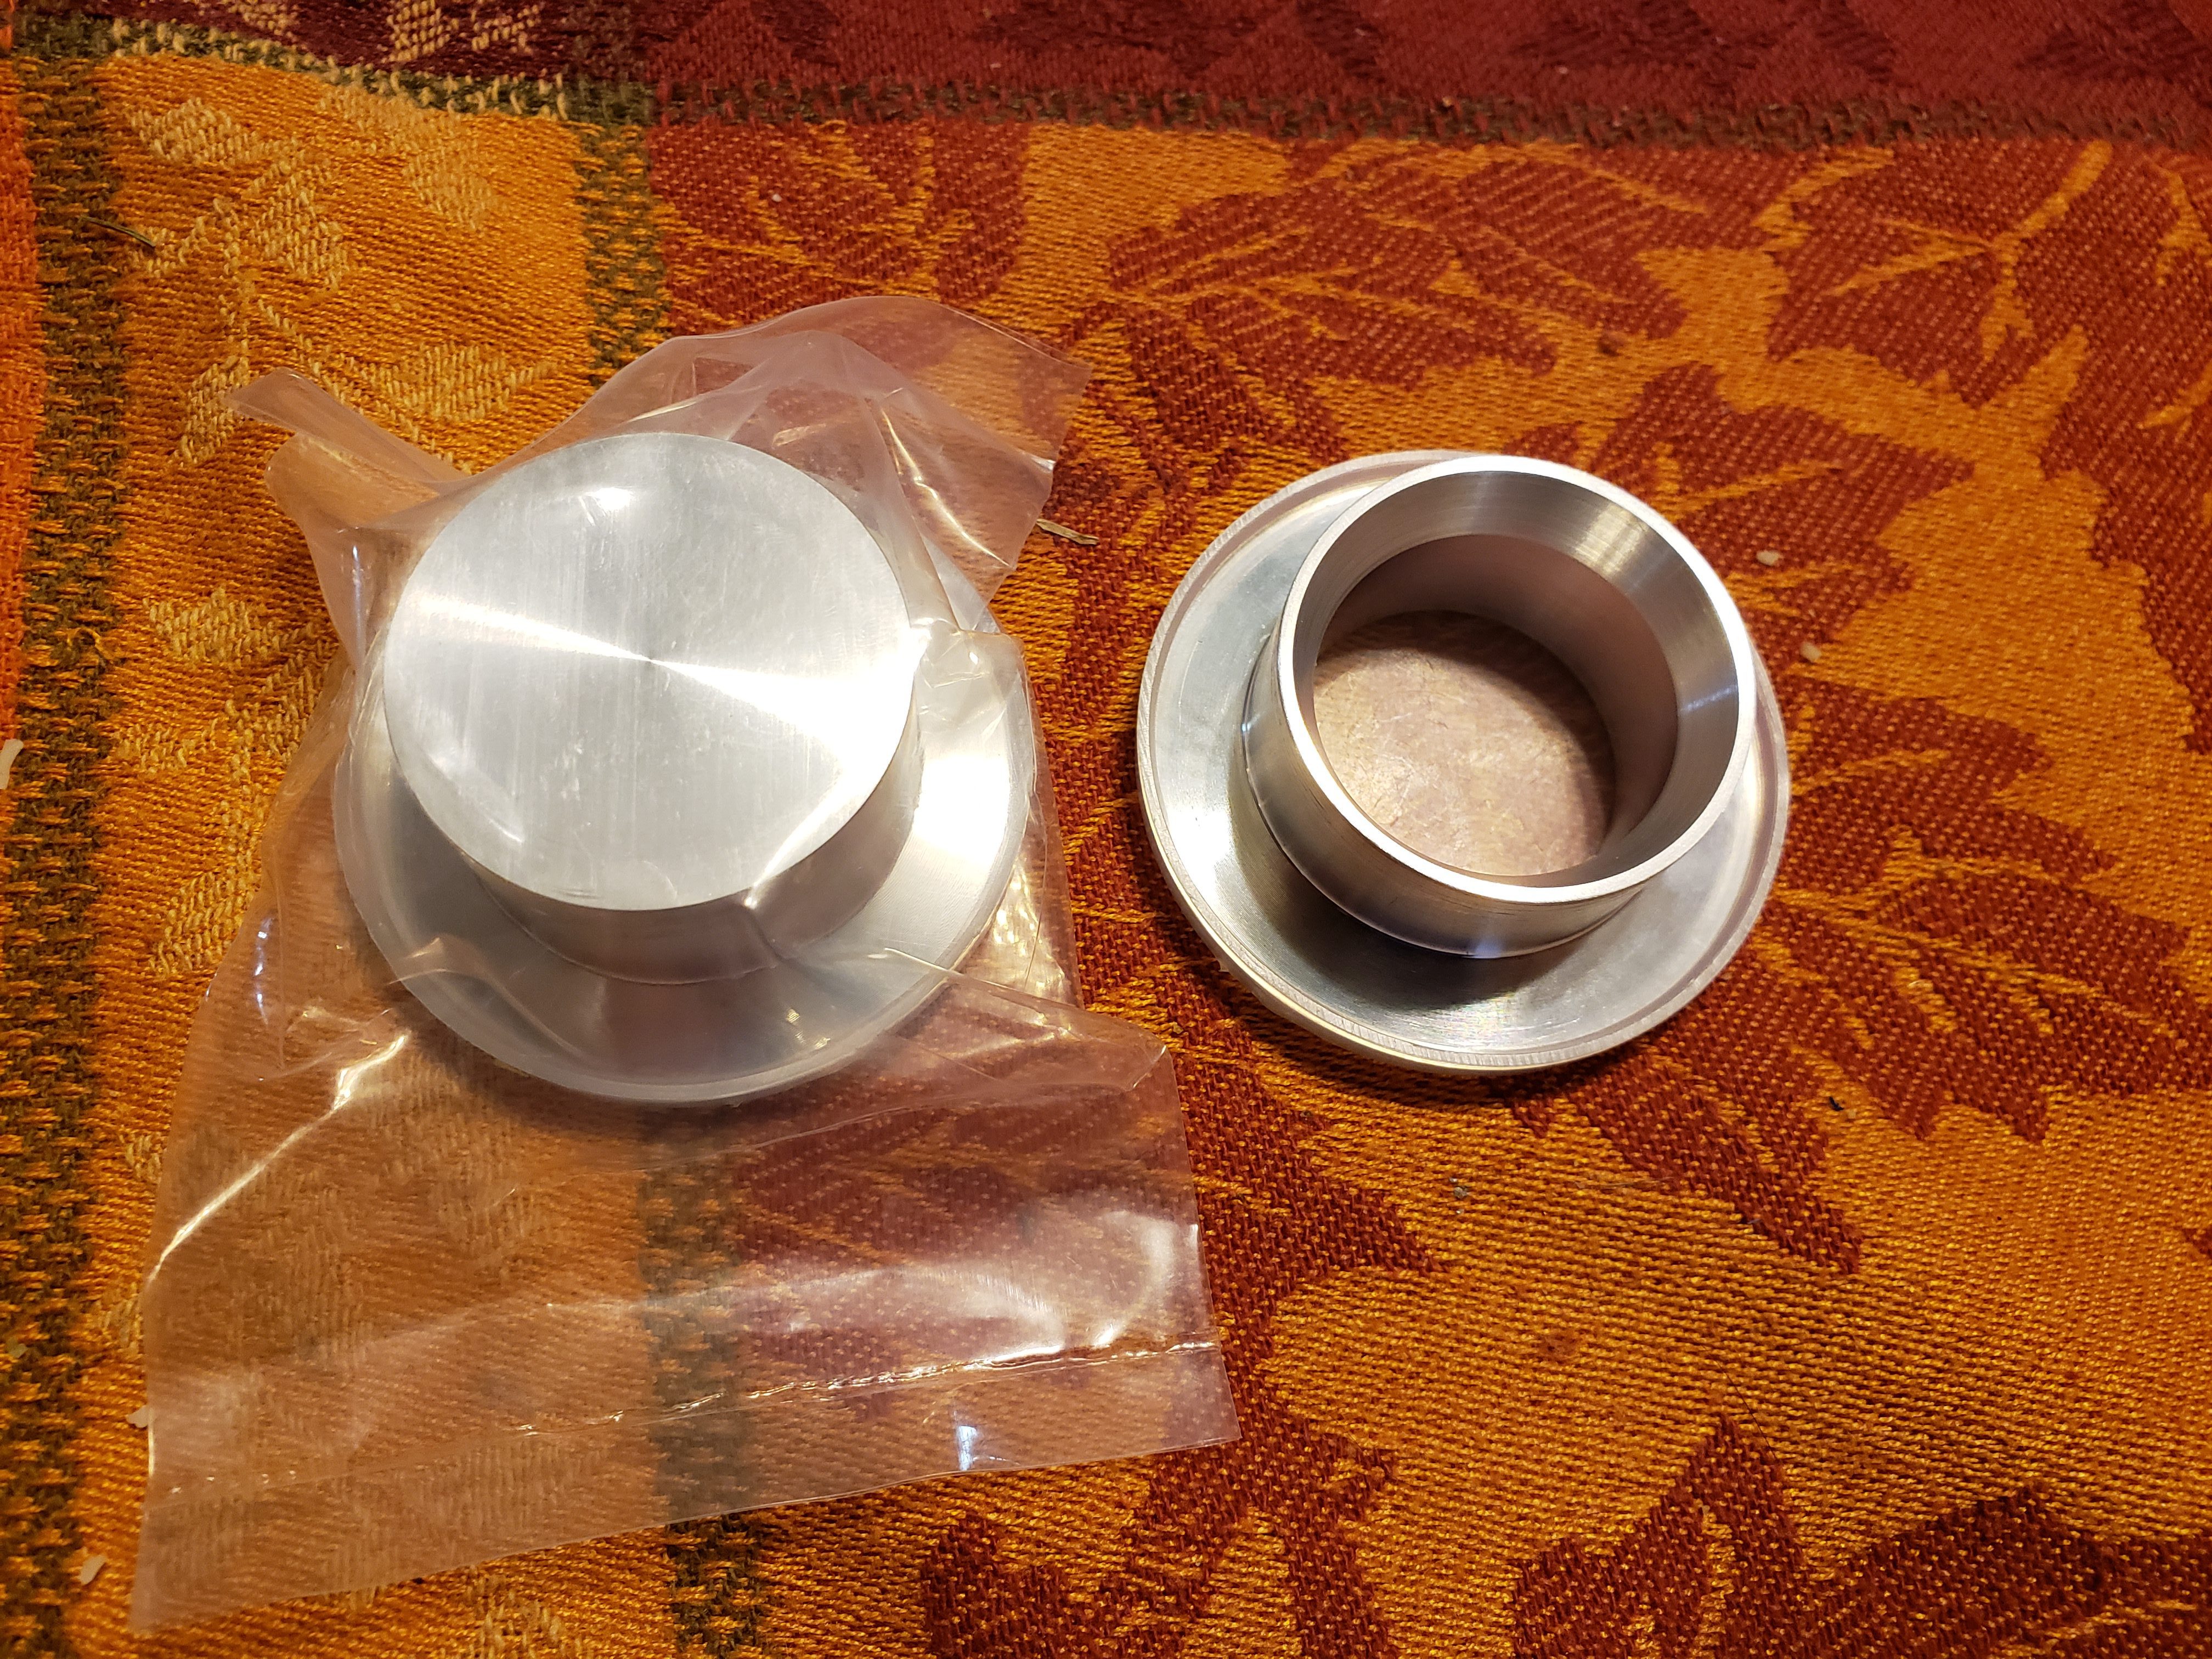
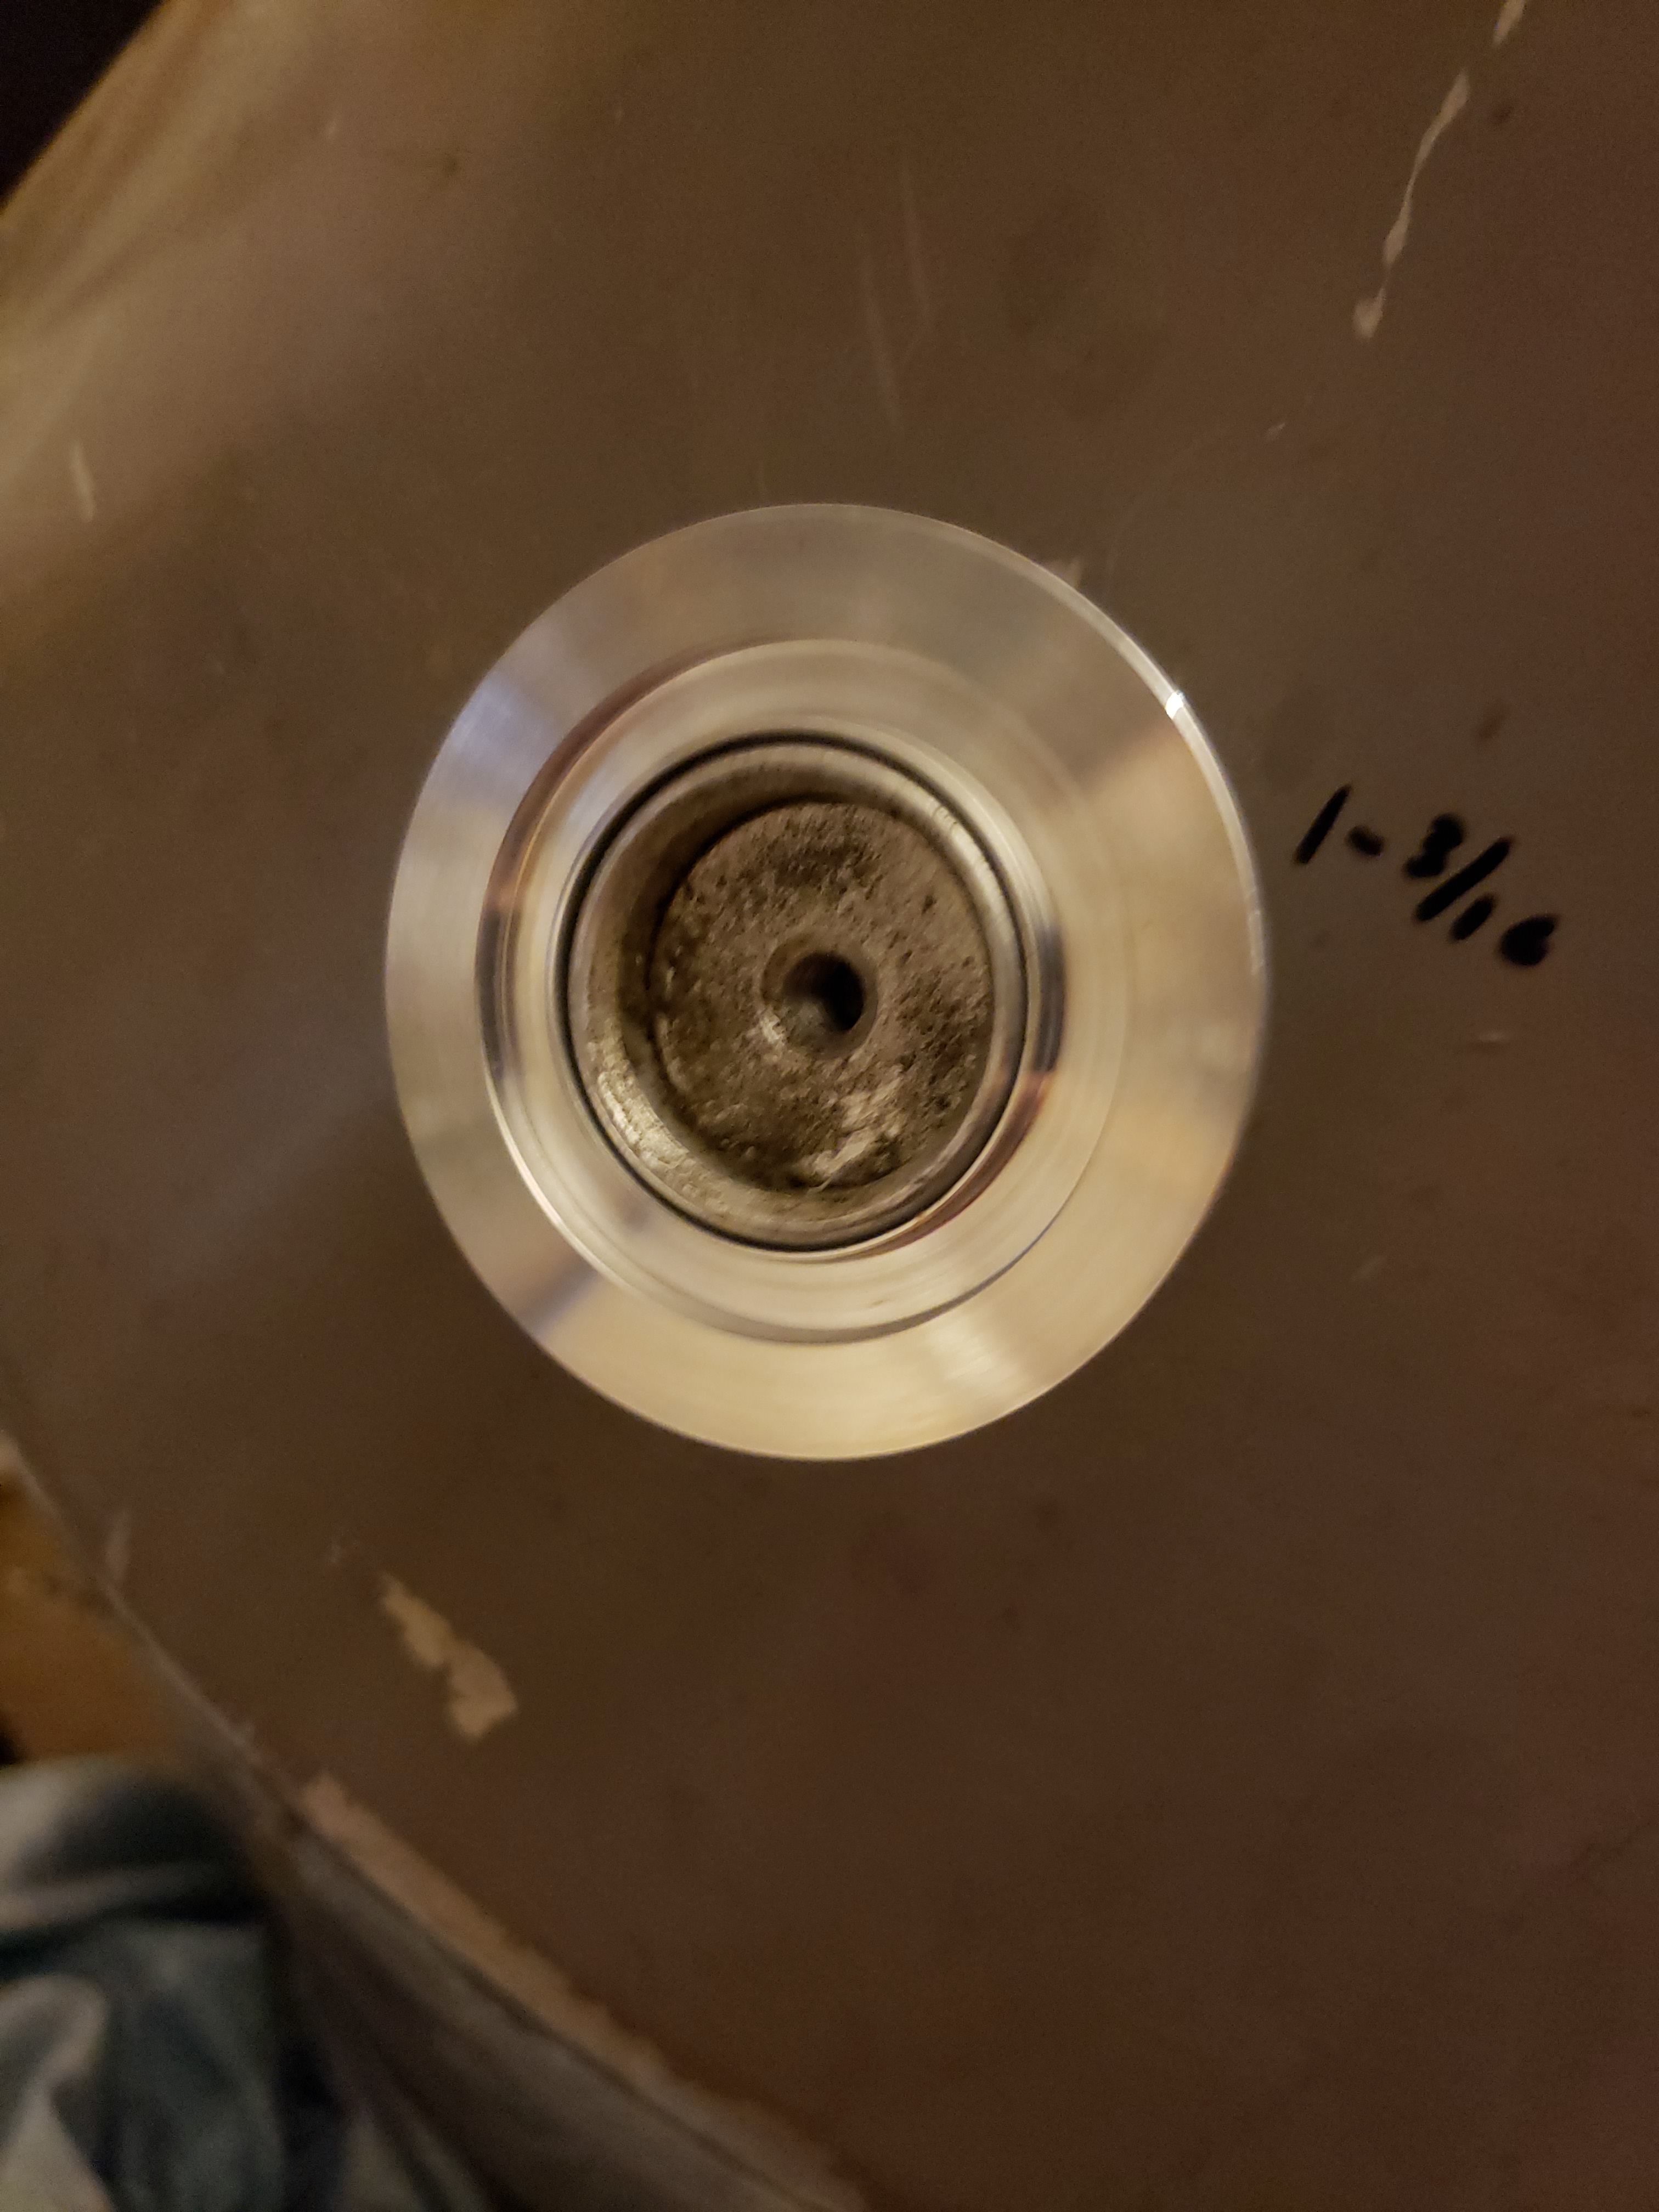
I’ll get a picture of it epoxied in place once I take it off the Dewar.
Vacuum Hardware
My 5/8″ wilson seal sat on a KF16 flange. This sizing is only important because a KF25 would not fit alongside the stem of an HPGe I also intend to refurbish the vacuum on at some point in the future, I wanted this assembly to be compatible with all my refurbishment projects.
I have a 4 way cross connected to a 3 way Tee. The gauges sit on one leg of the cross, and are a pirani gauge and a cold cathode penning gauge. Together they can read from ATM to 10^-8 torr or so. The piston travels thru the 4 way cross, with the vacuum being pulled thru my turbo pump on the the bottom.
I thoroughly cleaned all the parts with alcohol prior to assembly, and pumped on it with the turbo for 3-4 days before even attempting to actuate the valve. The last thing I want is moisture to get inside the dewars interstitial volume, and my garage is very humid this time of year. (its also been raining a lot lately.)
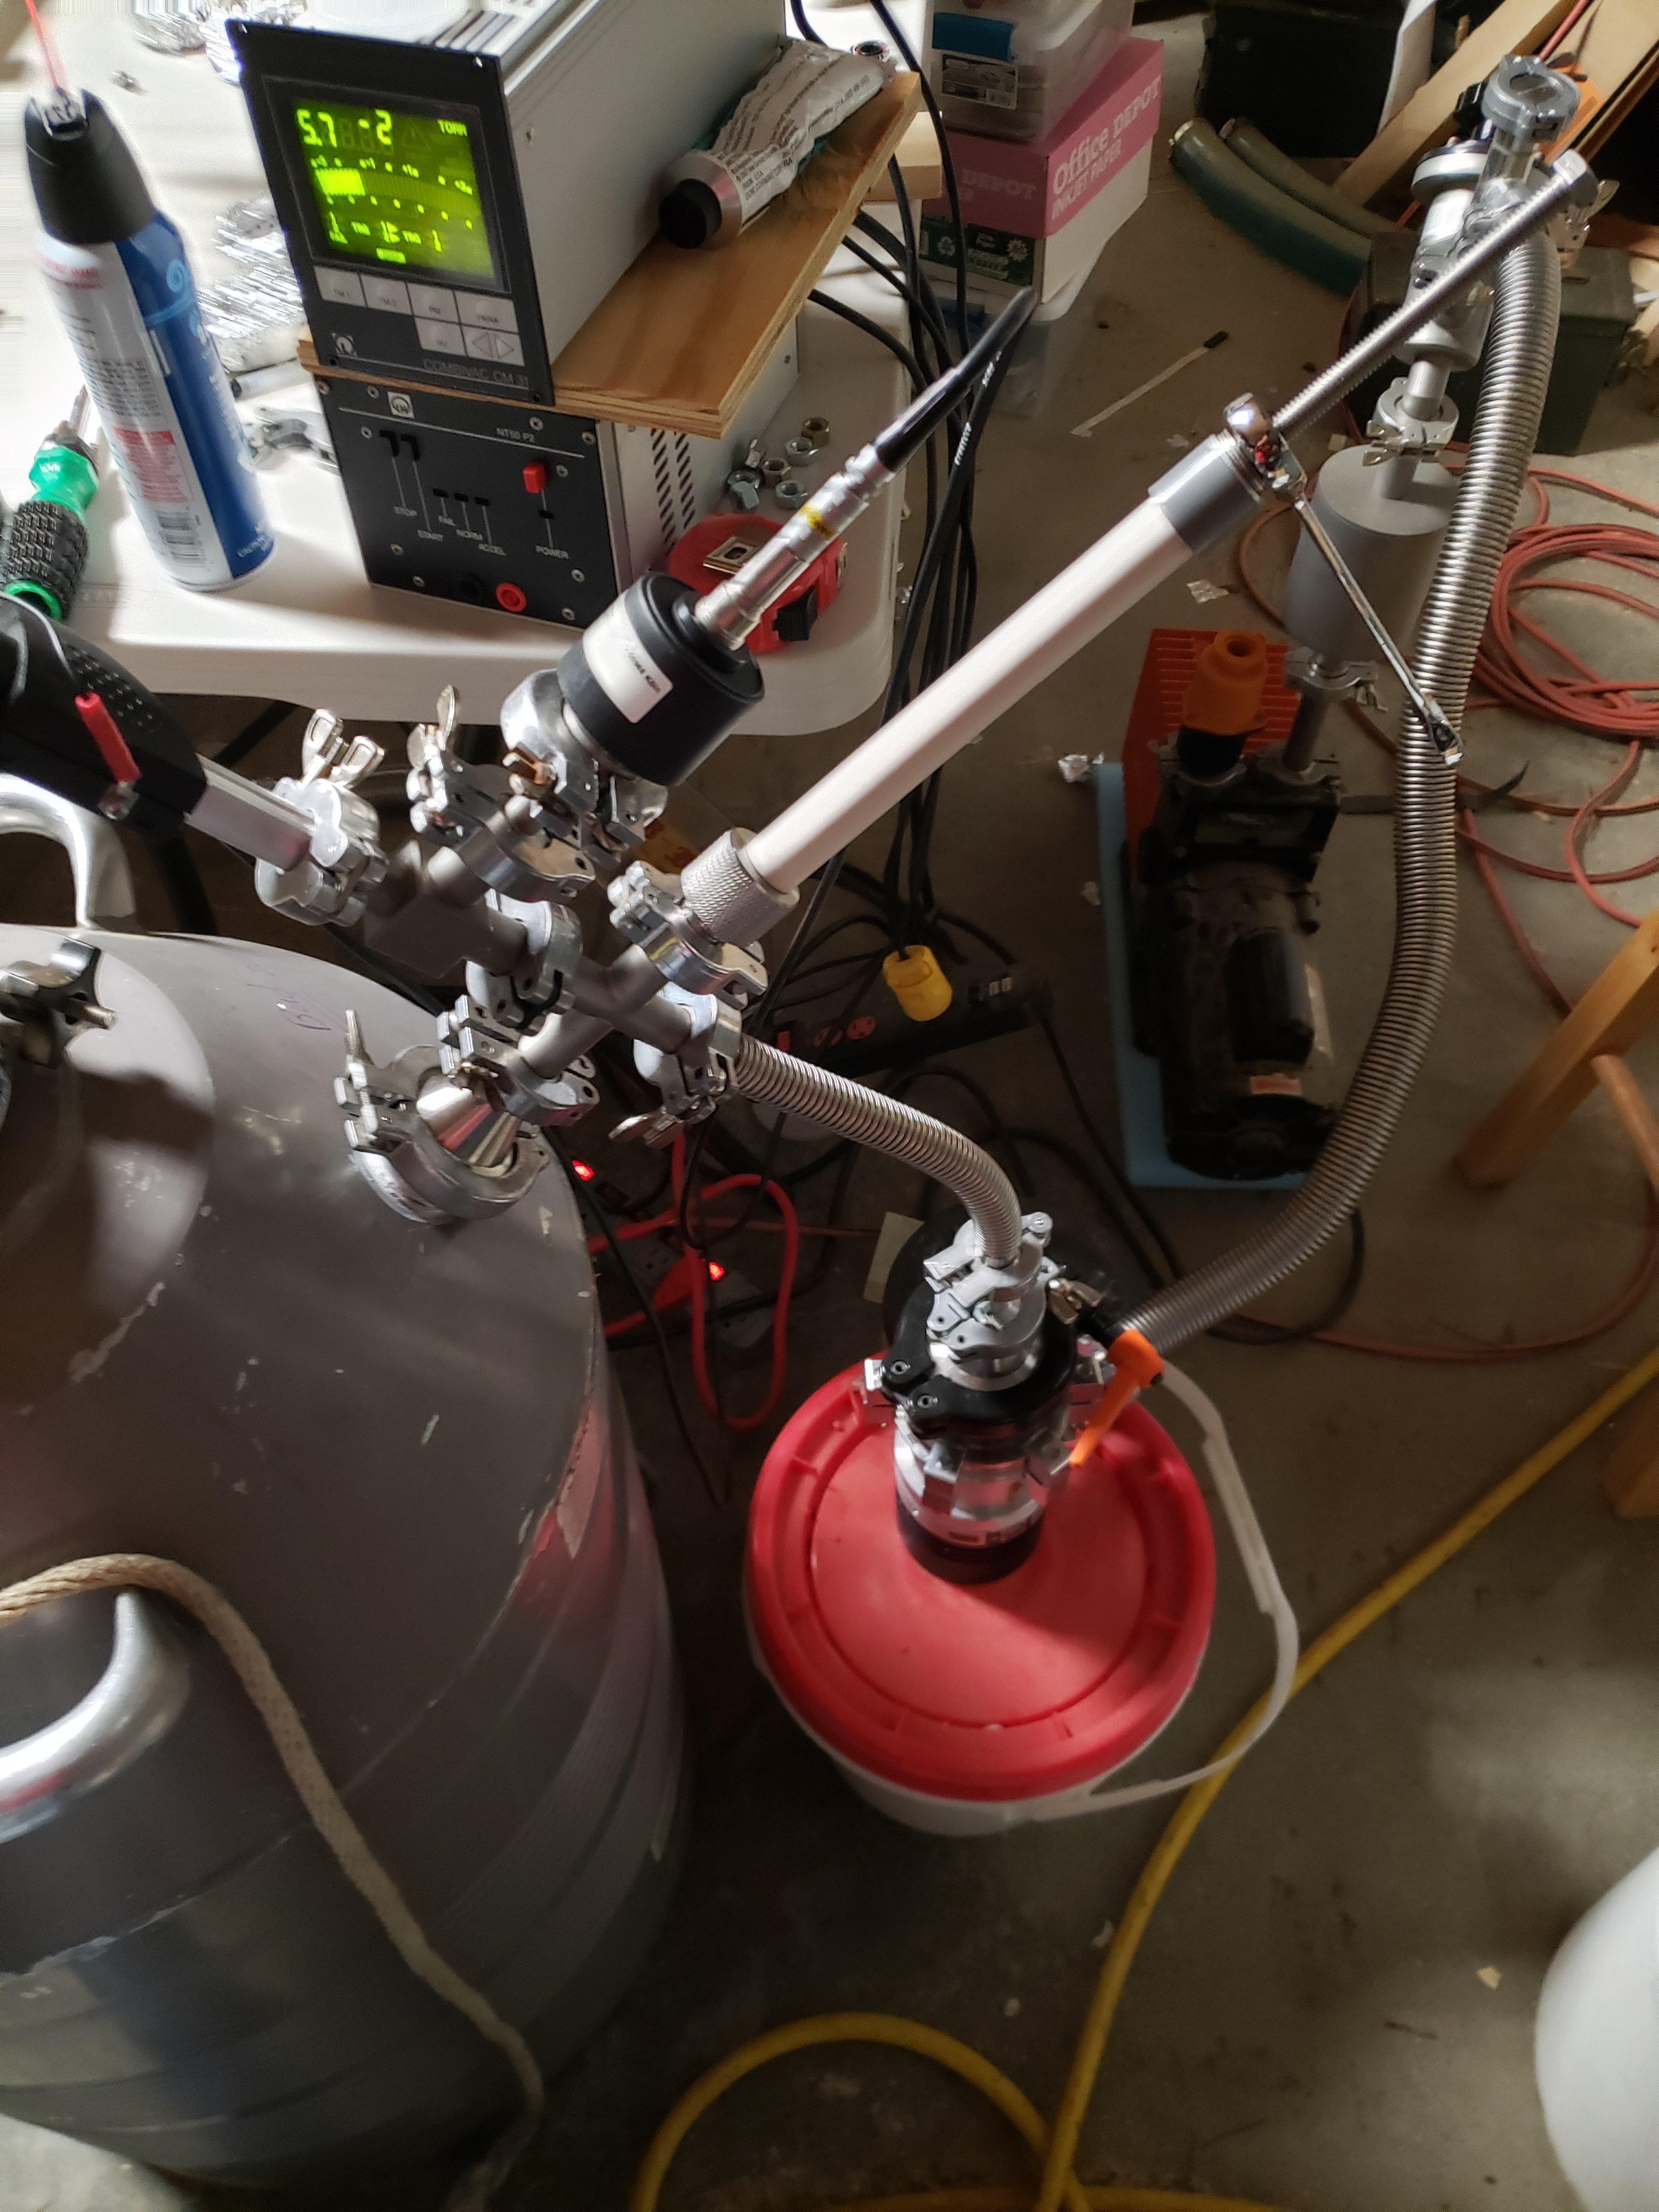
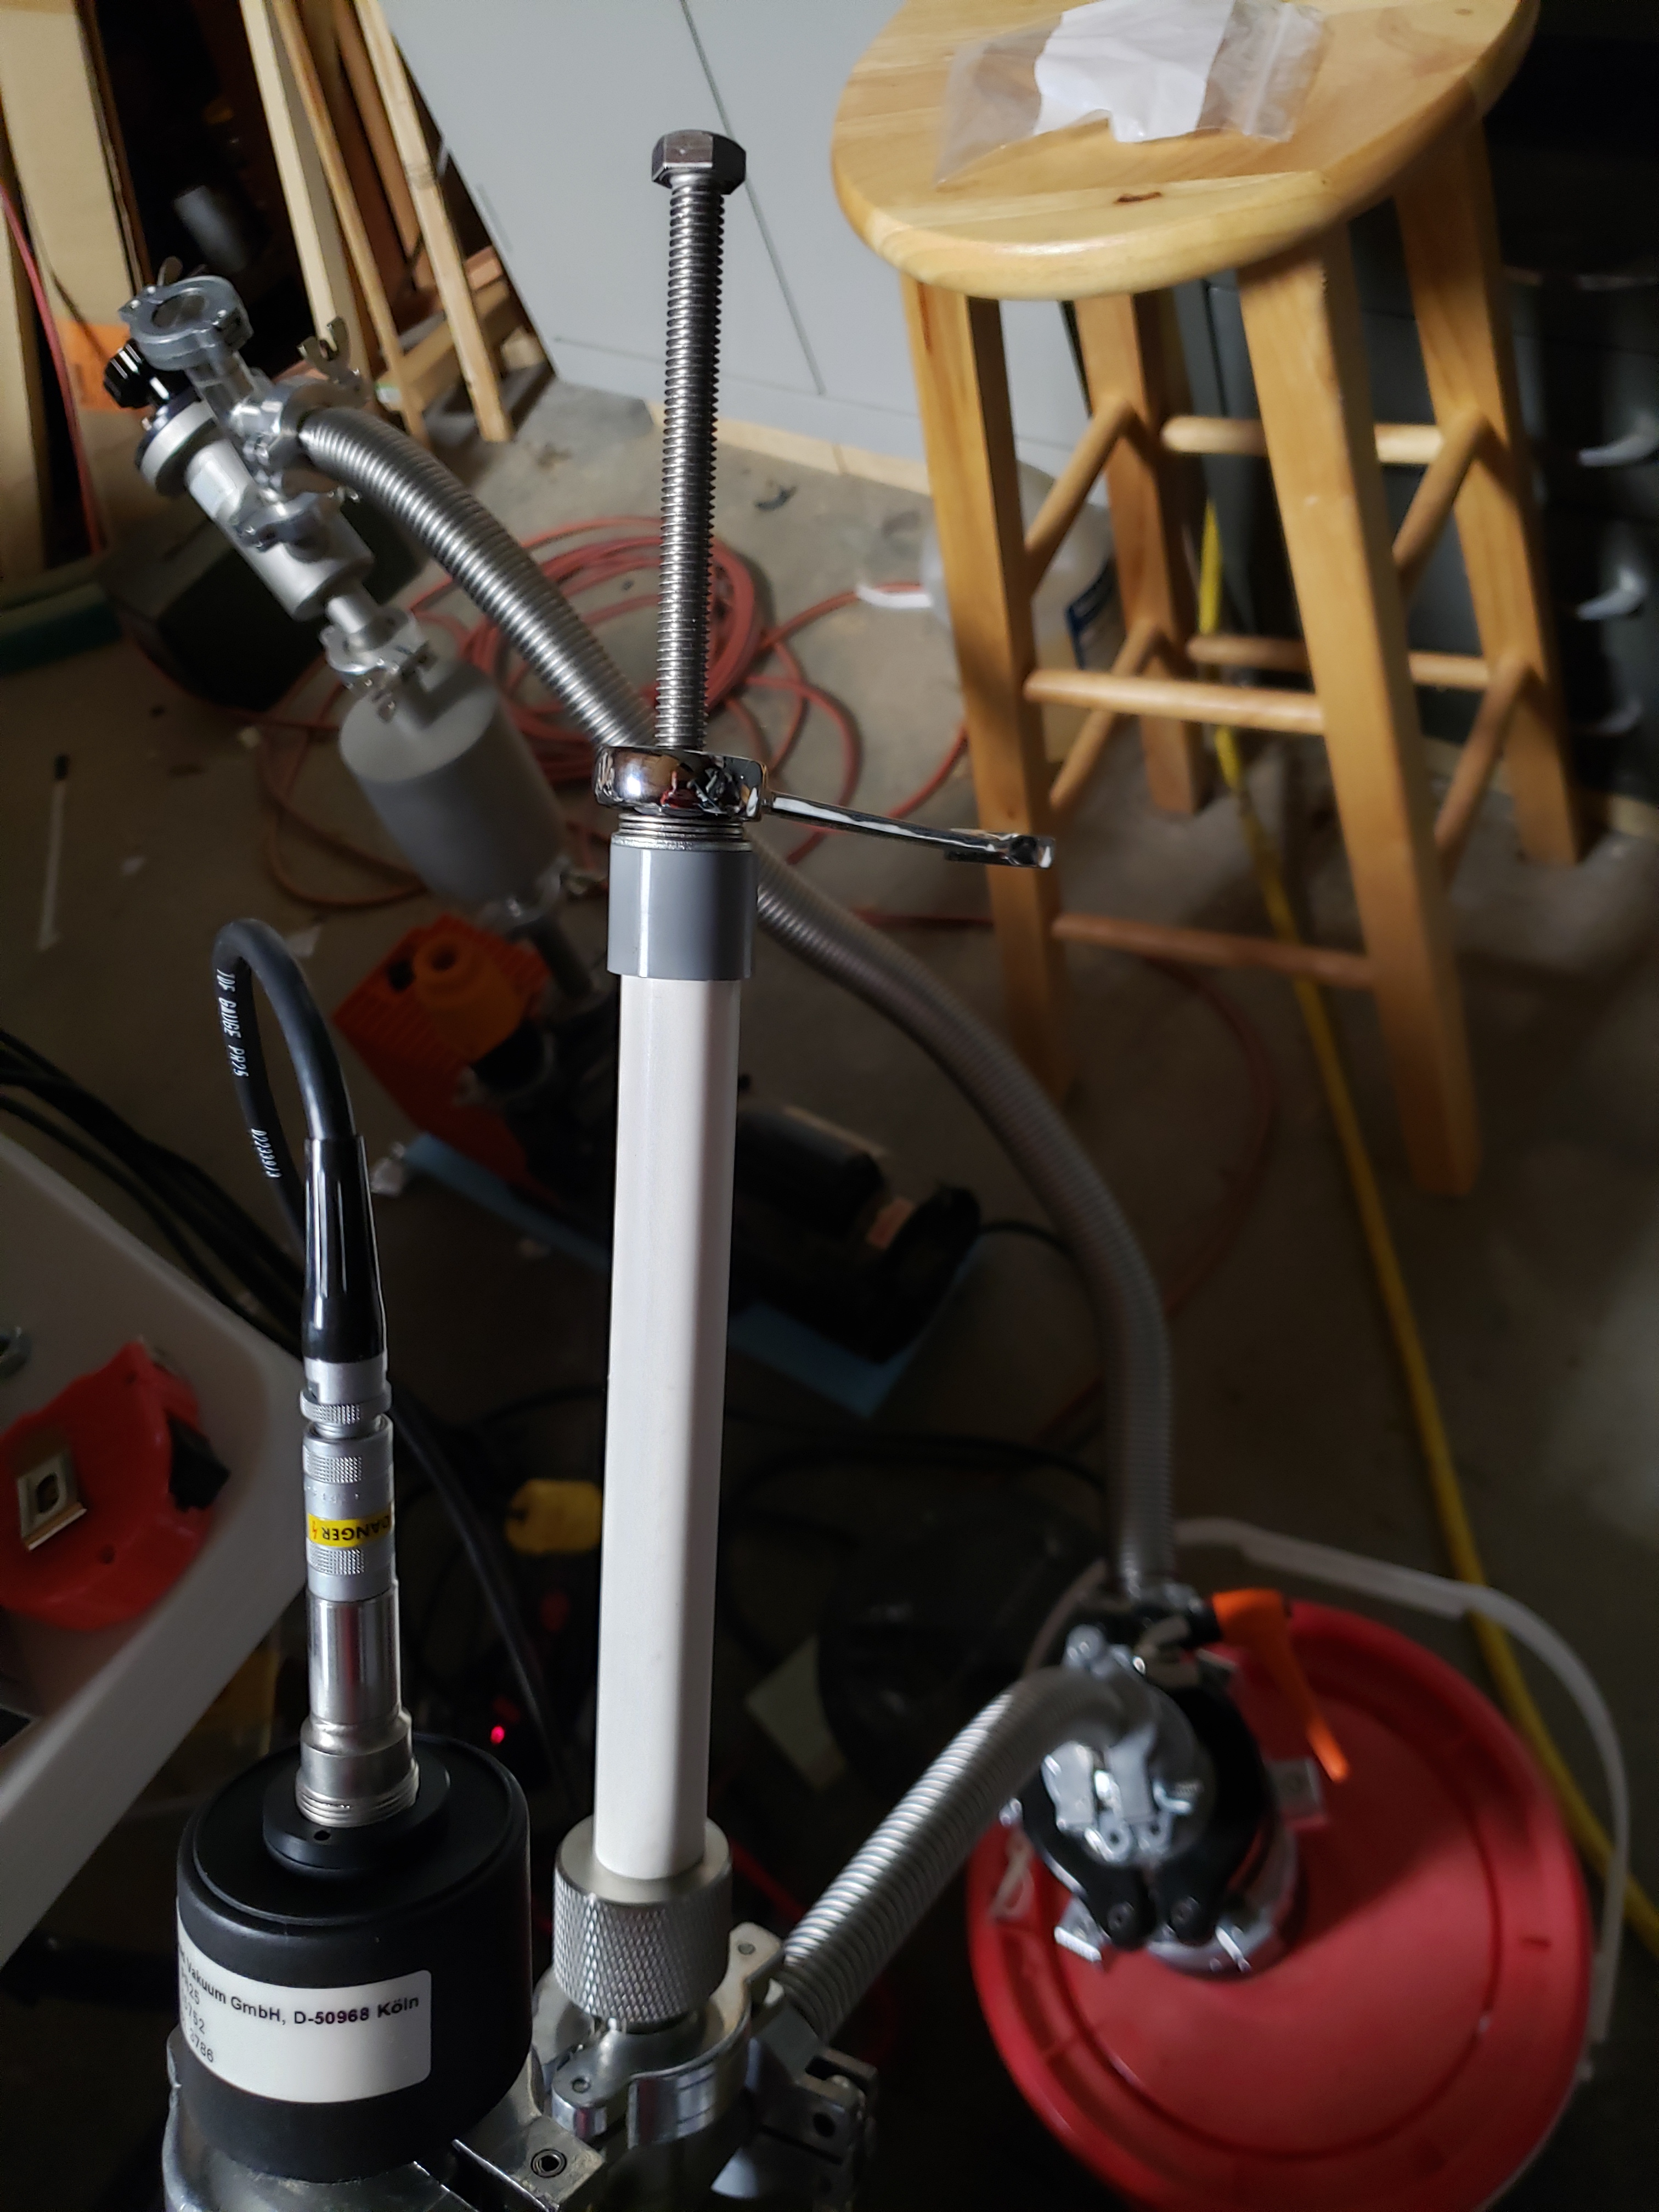
Linear Actuator
My linear actuator is a 1/2″ precision ground rod of tooling steel fit with a 1/2″ Wilson seal on a KF16. A 1/2″ rod fits nicely into the 5/8″ bore of the KF16 parts with moderate clearance around it for gas movement. A driving point at using 1/2″ rod, was the 3/8-16 thread requirement for the 1-3/8″ valve. I bored both ends of the rod, and drilled holes for 1/4-20 (1-3/16 valve), 8-32 (5/8″ valve), and 3/8-16 (1-3/8″ valve). The 8-32 threads are nested inside the 3/8-16 threads. Once again enabling me to use this one piston for all 3 of my dewars valves.
I placed a shroud of PVC pipe around it to act both as a dust cover and provide something for my bolt and nut to push against. The nut turns on the bolt which is threaded into the back of the rod. By turning the nut, I apply pressure to the pipe, which causes the bolt to pull the piston outward. After initial application of force via the nuts rotation the valve opens and will move more freely by hand. I position the valve plug to be between both the valve and the conical KF40-KF16 adaptor. In retrospect a KF40 nipple about 2-3 inches long would be ideal for this location. Enabling better gas flow around the plug in this space. I will have to keep my eyes peeled for one on ebay.
Initial Pump Down
Initial pump down consisted of trying to pump contaminants out of the adapter assembly, moisture etc. In a perfect world I would have a cryo-trap; but meh.
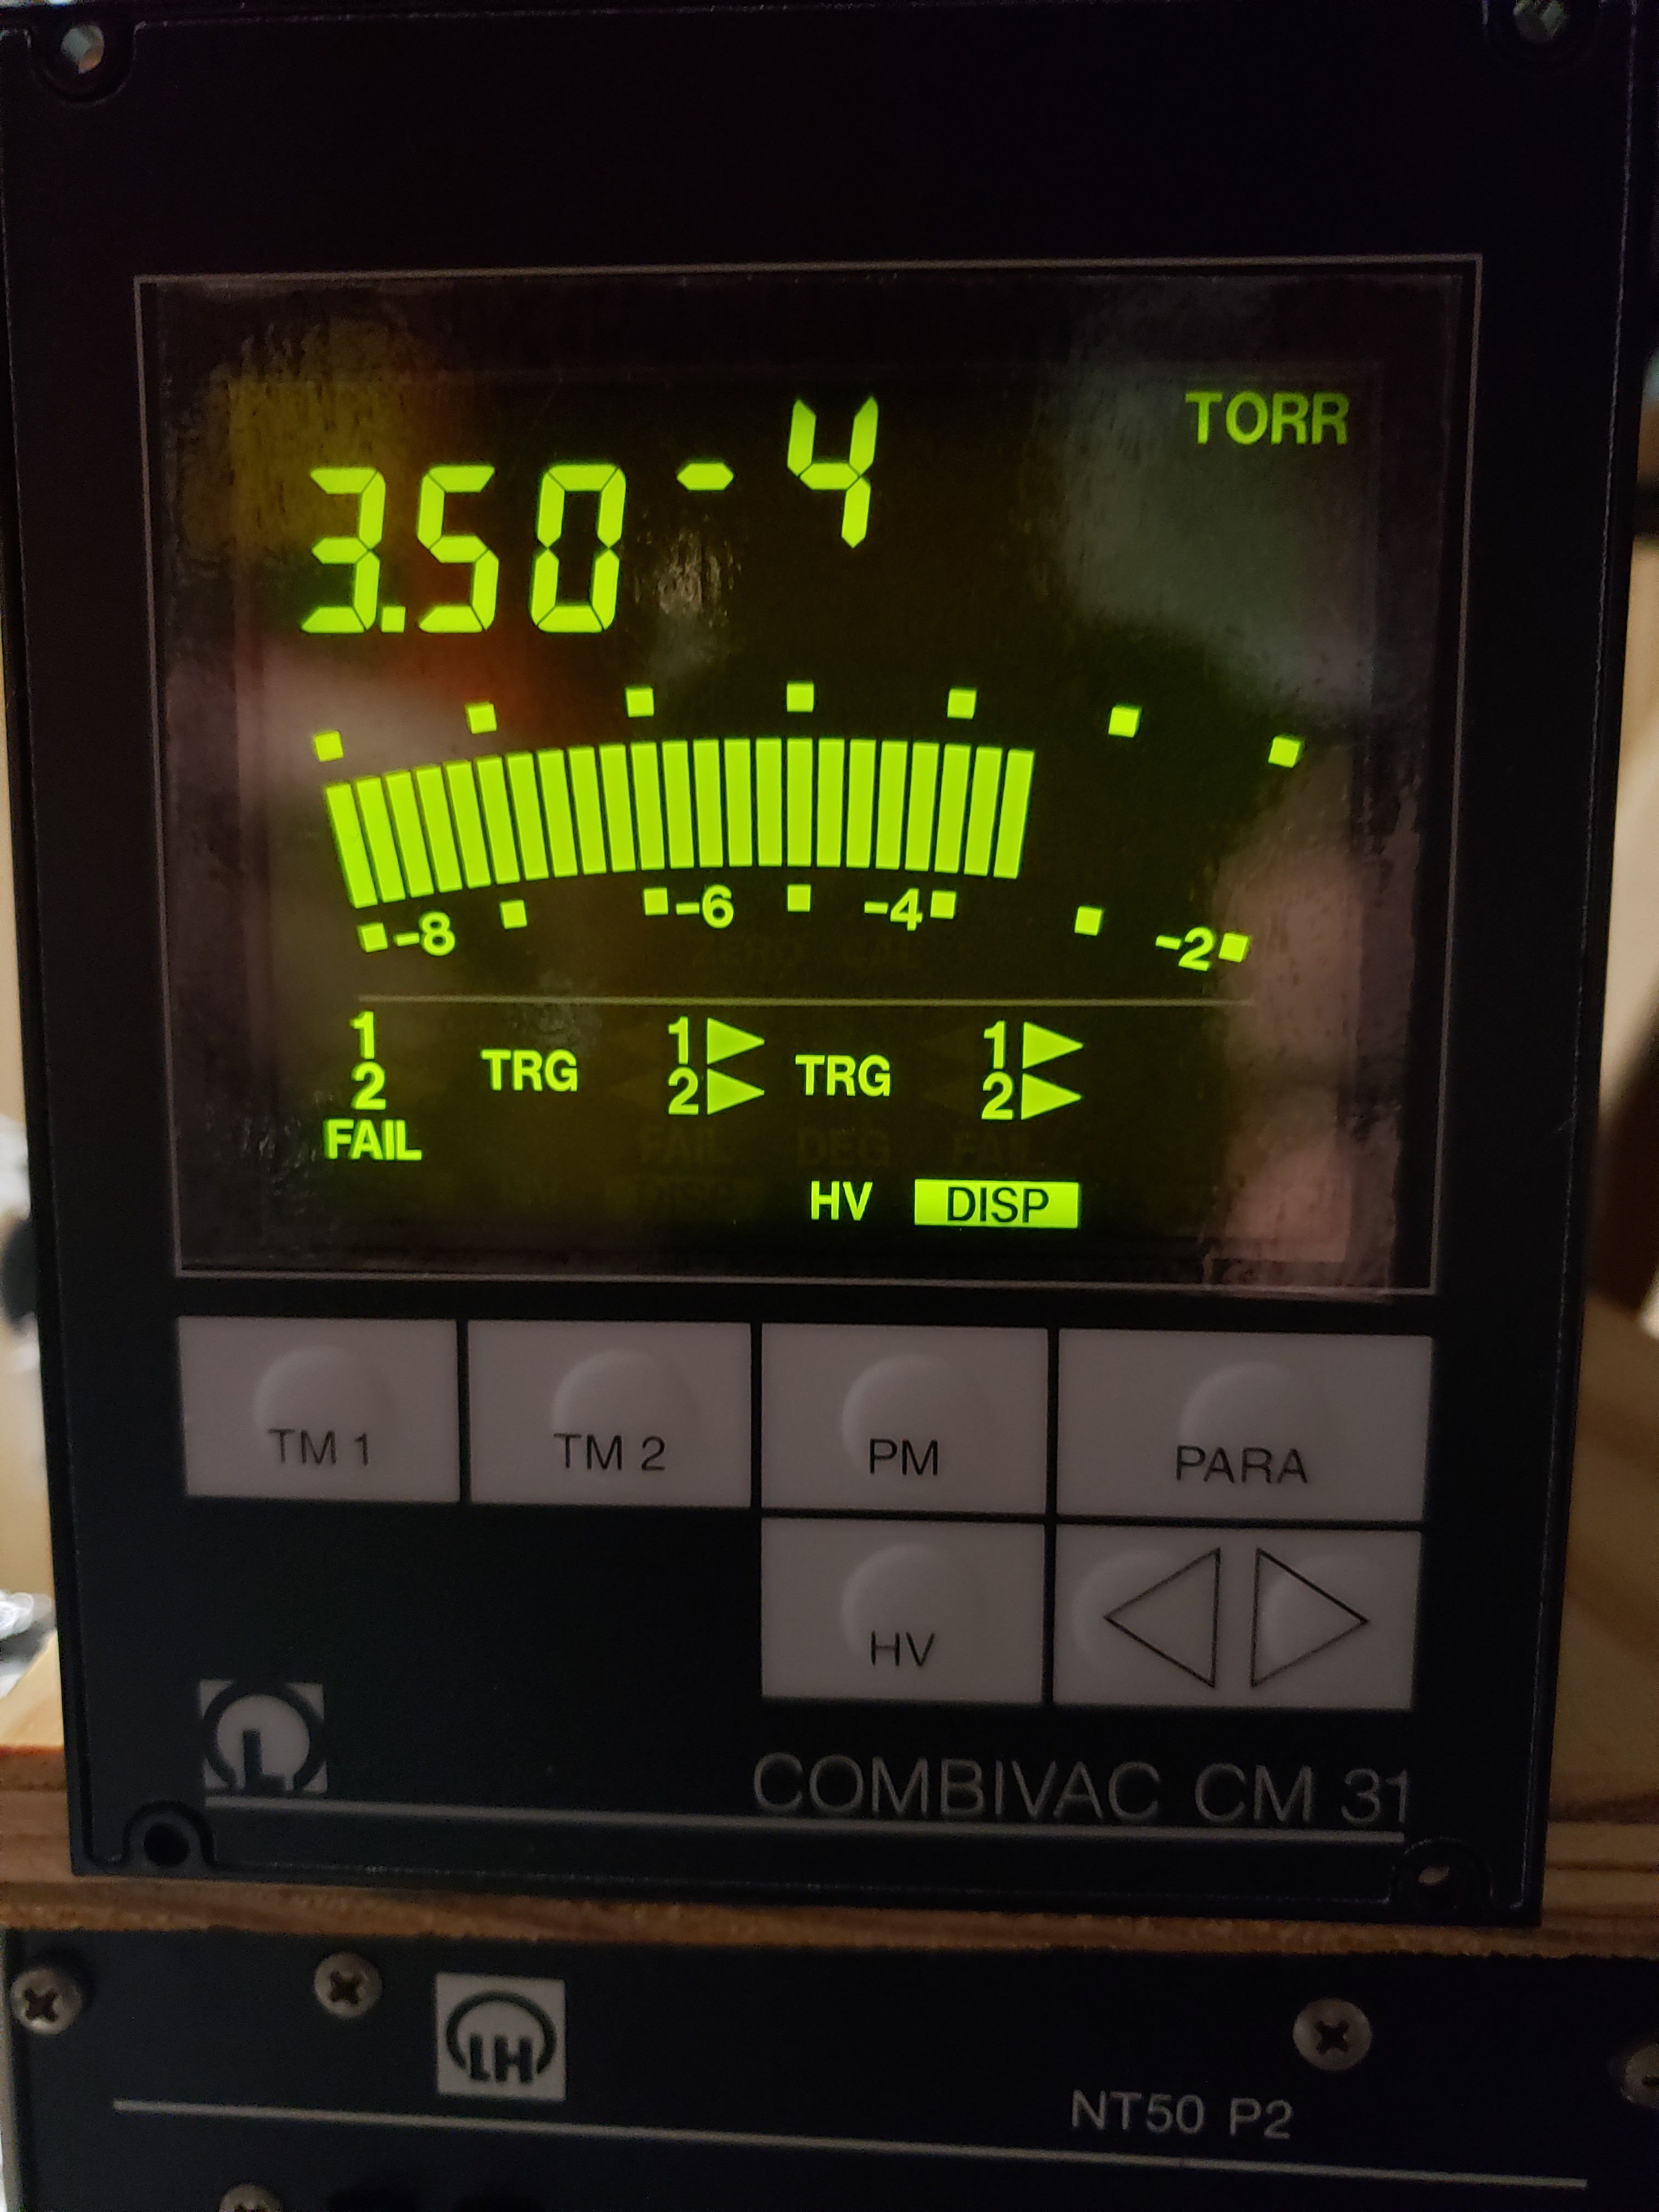
I Pumped on it for several days with the turbo running, and discovered I had a slow leak; about 1/10th of a mtorr per 20 seconds. Probably a spec of dust on an o-ring, my garage isn’t the cleanest. I took everything apart and applied vacuum grease to my o-rings. then pumped for 3-4 days to remove as much moisture as I could. I even took a hair dryer to every inch of the assembly to drive out more moisture.
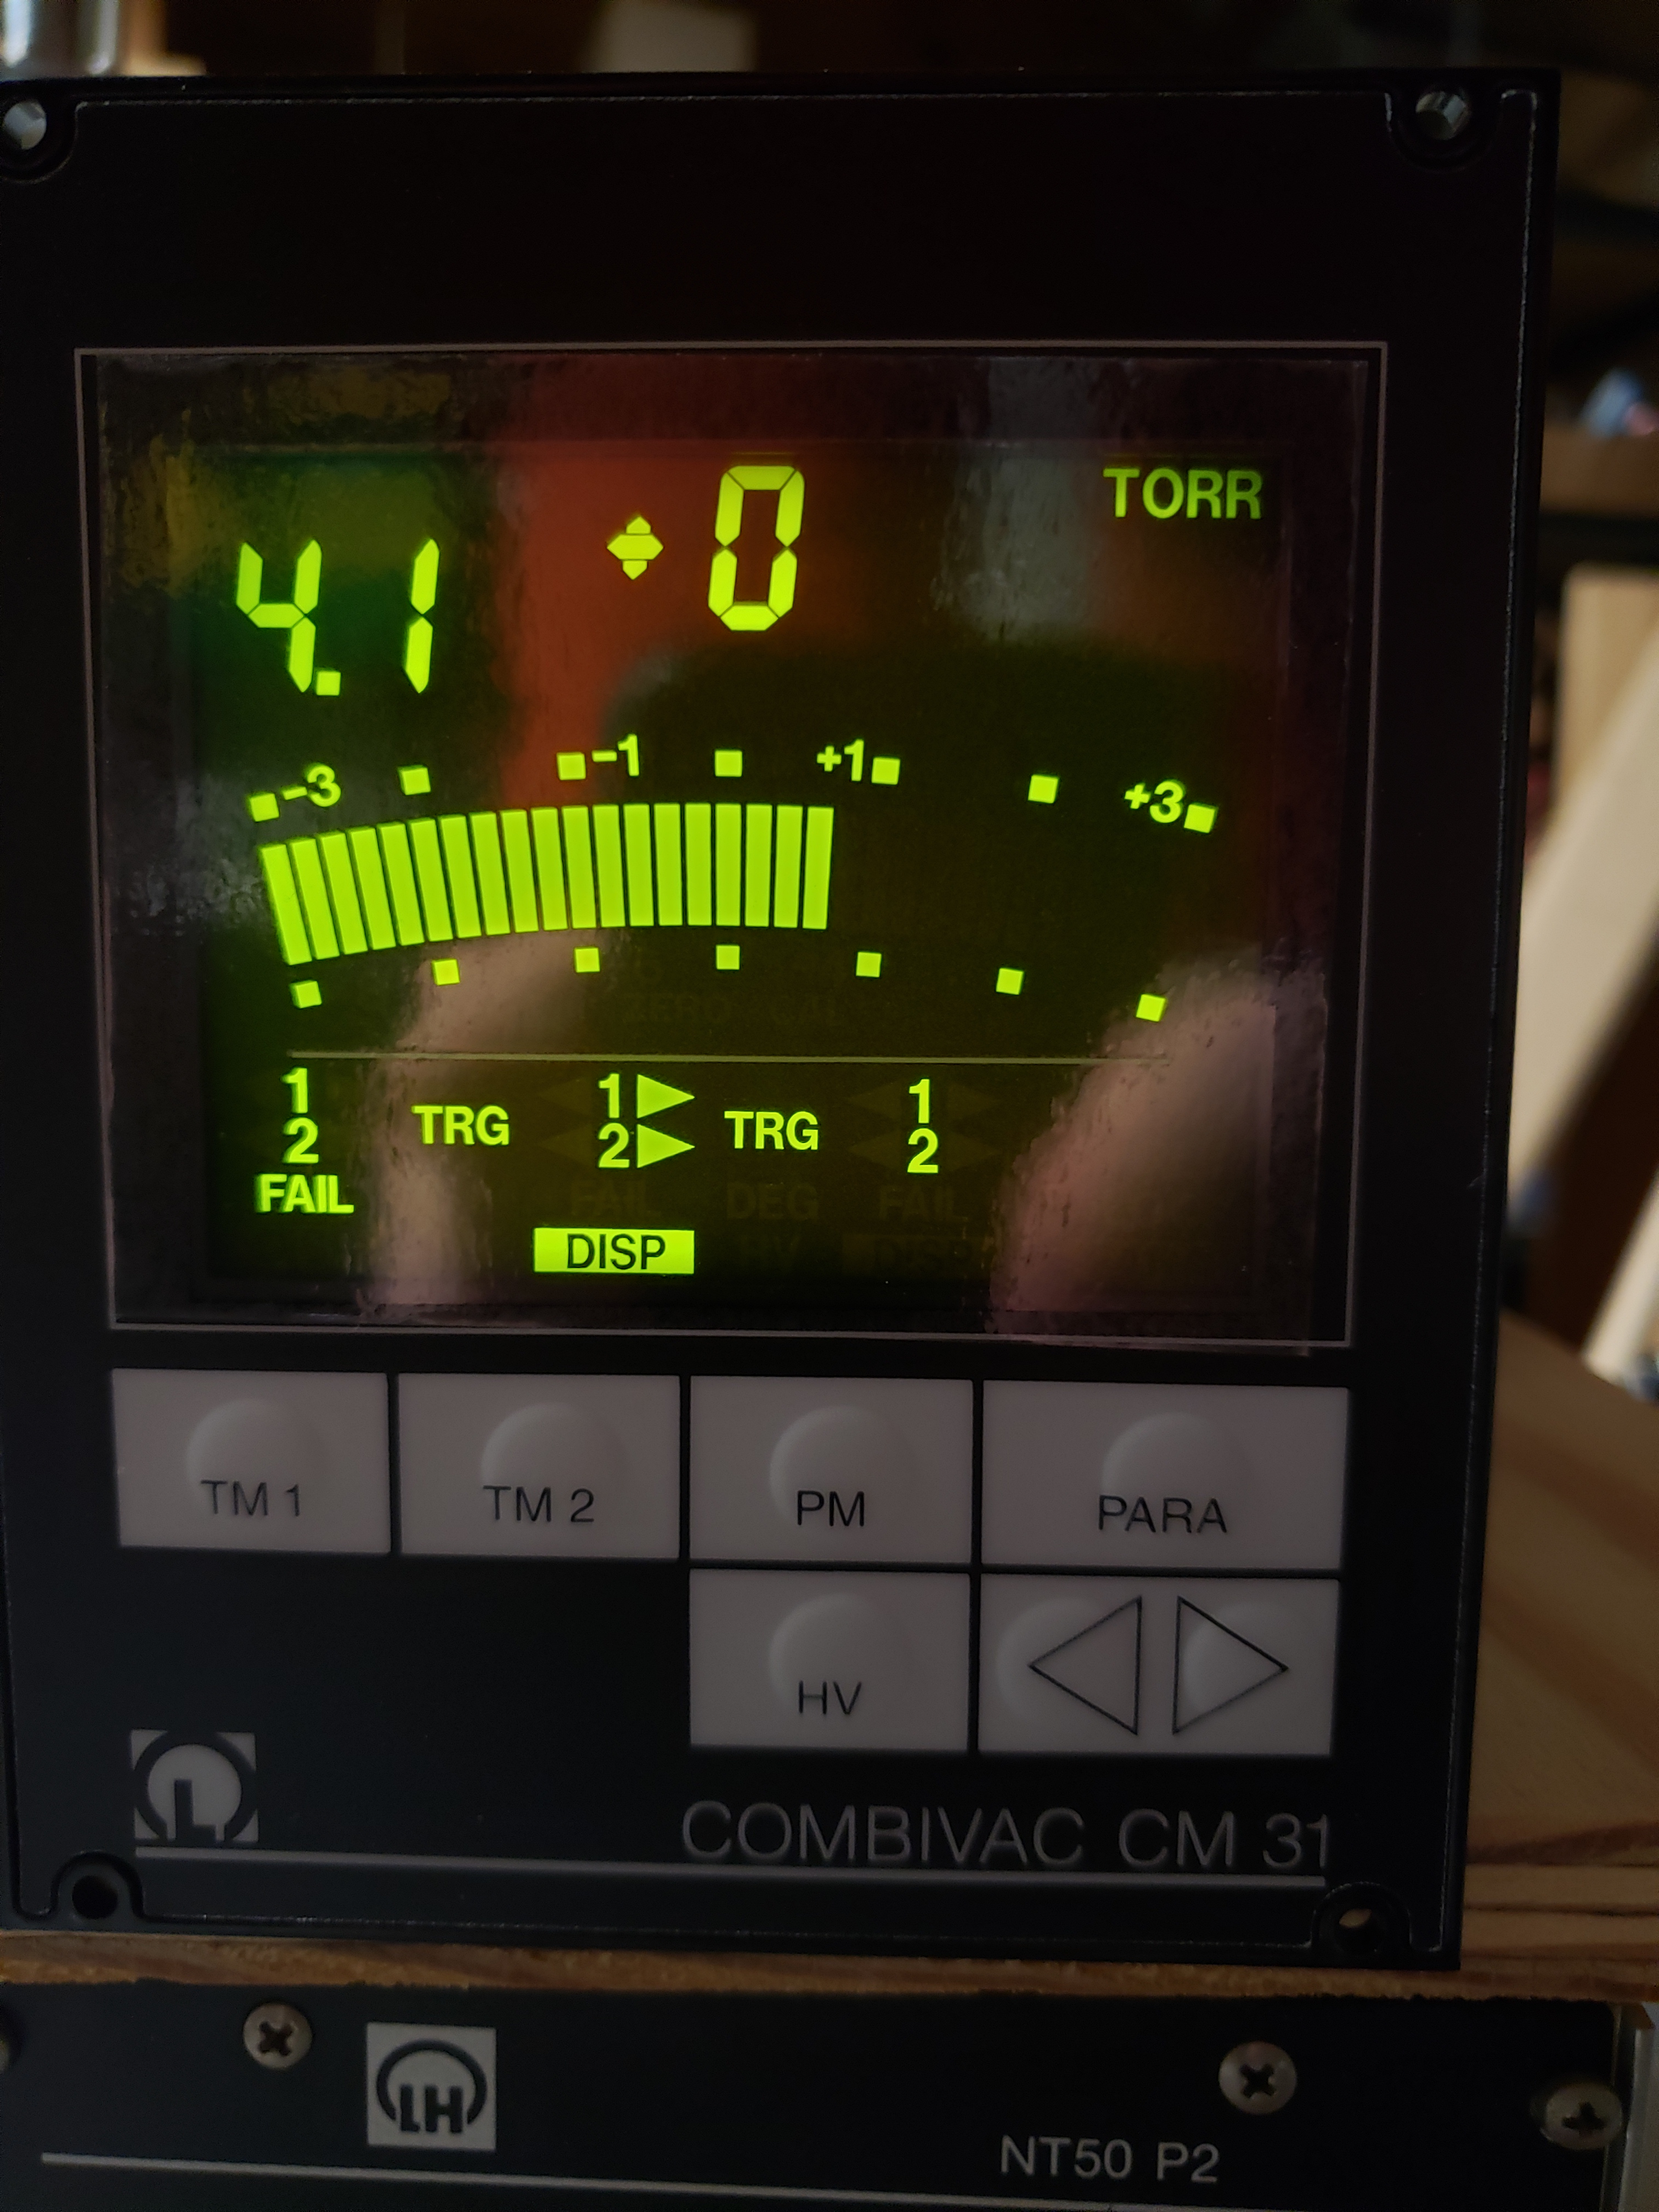
The initial pump out of the vessel is the most critical portion of the exercise. I began by turning off the turbo and waiting for it to spool down. I closed off my roughing pumps valve and I slowly rotated my actuator nut, barely cracking open the dewar. Observing the vacuum slowly rise from ~6mtorr to ~4.1 torr, it took a while to level off, and you want it to.
One key detail that needs to be followed here, is that you don’t want to suddenly change the vacuum in a dewar. All that insulator material we were discussing earlier. If you suddenly apply vacuum and the internal pressure is high the rushing of gas out of its fibrous structure will cause it to expand, which would be bad. Like wise, if you suddenly return to ATM, it will compress the fibers, which is also bad. Not damaging the fibers is important, so I performed my initial observation of the internal pressure very slowly.
I discovered that the internal pressure was low enough, that doing things slowly probably didn’t matter. But if I had been at ATM, or base pressure (which it wasn’t, cause I knew it was bad) it would have been worth the extra effort.
The ideal range for dewars vacuum level is apparently open for debate to the casual google surfer. I saw 1mtorr to 100mtorr quoted as being good enough. I am simply going to shoot for as low as I can get, in say a weeks worth of pumping and call it good.
Ongoing Work
I will pump on the open dewar for several days, and then use a hair dryer to heat the internal volume of the Dewar and a space heater on the outside for a few hours. Driving off contaminants stuck to the internal surfaces of the interstitial volume. More importantly some of that heat will transfer to the fibrous insulation and drive more contaminants out of its massive surface area.
I’m trying to figure out how to do the same thing with a 50L dewar.
very nice work! I wonder if anyone has simply built a flange adapter like is actually used when pumping down these dewars? ( ie https://www.cryocomp.com/wp-content/uploads/2016/04/vacuum-valves-v1000-installation-pumpout-datasheet.pdf ) As well, do you think the pressure could have benefited from a cryopump in the loop? (or does it not add anything to the turbopump?)
I certainly thought about making an actual flange adaptor, but I had to weigh my time commitment verses the difficulty. I have 3 different dewars, with 3 different flanges, and I would need to make a new adaptor for each.
Or just bore out a KF40, epoxy it in place and use some vacuum hardware I had laying around.
I suspect I would have benefited from a cryopump in the loop, but probably only if I actually got it lower with the turbo. There is a massive surface area in the fiberous structures within the dewar, just takes forever to pump down, but you only really need like 100mtorr to get effective vacuum isolation, so the question becomes why bother with the extra effort.
I am working on a part for the same purpose; however, I am having trouble with sealing the system off around the rod/bolt entry point. Do you have any feedback as to what part could seal the system and still allow for movement of the rod. What is a wilson seal?
I am trying to create a valve adapter as well. I am currently having trouble finding a way to seal the top of the system where the rod/bolt enters. What is a wilson seal? Do you have any advice on this problem?
https://www.ajvs.com/kf-quick-disconnect-adapter-14578
Something like this,
Basically smushes an oring with an angled ring such that it expands inwards.
Lube it up and it works pretty good.
If you want to pull ultra deep vacuum however you’ll need a bellows to seal it completely. Fortunately the dewar doesnt need a deep vacuum.
Thank you! I will look into this. I appreciate your help. You made a really interesting set-up to get this done.
No problem! Hope you get your dewar sorted!!